College Basketball Training

5 Elite Three-Point Drills

The drills that build knockdown shooters from beyond the arc. Each drill is broken down step-by-step with court diagrams, coaching points, scoring standards, and progressions.

01

— Celtic Shooting
High Volume
Catch & Shoot
Endurance

The gold standard of three-point volume drills, used by college programs nationwide. Seven spots around the arc, rapid-fire catch-and-shoot with a rebounder and passer. The goal: 100+ three-point attempts in under 10 minutes. This drill builds stamina, rhythm, and the automatic release that defines elite shooters.

10

Minutes

100+

Attempts

2-3

Players

3PT Arc

Range

Very High

Intensity

70%+

Target

Shooter
Passer
Spot
▲ Cone

The 7 Spots : Mark seven positions around the three-point arc — right corner, right wing low, right wing high, right elbow, top of the key, left elbow, and left wing. A passer/rebounder stands in the paint with a rack of balls. The shooter starts at spot 1 and works through all seven in sequence. Each spot gets a set number of shots (3, 5, or 7) before moving to the next.

Shooter
Passer
Spot
▲ Cone
Catch-and-Shoot Rhythm : The passer delivers a crisp chest pass. The shooter catches with feet already squared to the basket — hands up, knees bent, ready to fire. The ball touches the hands and goes UP immediately. No extra dribbles, no hesitation, no re-positioning. Catch, 1-2 foot rhythm, release. The entire sequence should take under 1 second. This IS the three-pointer in college basketball — 85% of threes are catch-and-shoot.
Shooter
Passer
Spot
▲ Cone
Rotation & Pace : After completing your reps at spot 1, immediately jog to spot 2. No rest between spots — the movement IS the rest, just like in a game. The passer must be quick: rebound, outlet, pass — keeping the pace relentless. After all 7 spots, that’s one cycle. Do 2-3 cycles for 100+ total shots. Track makes at every spot to identify your hot zones and weak zones.
Shooter
Passer
Spot
▲ Cone
Game-Speed Progression : Level up: instead of jogging between spots, add a cut or a relocate. Sprint to the paint (simulating a drive-and-kick read), then sprint out to the next spot and catch-and-shoot. Or add a change of direction with cones between spots. This simulates how threes actually happen in games — you’re never standing still before the catch. Every shot comes after movement, just like real offense.
Coaching Points

1 Sprint at 100% to the spot — the drill doesn’t work at 70%. Game speed or nothing.


Hands above the waist at all times — “show your target” to the passer as you arrive at each spot

 
3 Same release point on every single shot — consistency is built through volume, not thinking
4 Don’t slow down when you miss — the next rep is the only one that matters
5 The passer controls the pace — a great passer makes the shooter better. Crisp, chest-high passes only.
6 Track your hottest and coldest spots across 2 weeks — then spend extra time on the cold ones
Scoring Standards
Result

Assessment

Make 70+ / 100

Elite — D1 starter level

Make 60-69 / 100
Strong — rotation player
Make 50-59 / 100
Developing — keep grinding

Make <50 / 100

Rebuild your mechanics first
Why Celtic Shooting Works
Volume plus pace. You’re taking game-speed reps in high volume — your body learns the shooting motion through repetition, not conscious thought. By rep 80, your form is automatic. That’s the goal: shoot without thinking.
Program Staple
Virtually every D1 program runs a version of Celtic Shooting. Villanova, UConn, Duke, and Gonzaga all use 7-spot rapid-fire drills as the backbone of their shooting development. It’s the single most common shooting drill in college basketball.

02

— Chase-Down Threes
Off Movement
Game Simulation
Conditioning

The most game-realistic three-point drill. You start inside the paint, sprint to a spot on the arc, catch a pass, and fire — simulating the way threes actually happen in games: off a cut, a kick-out, a drive-and-kick, or a transition fill. No standing-still reps. Every shot comes after a full-speed sprint, exactly like game conditions.

10

Minutes

60+

Attempts

2-3

Players

3PT Arc

Range

Very High

Intensity

55%+

Target

Shooter
Passer
Spot
▲ Cone
Setup : Shooter starts in the paint — at the block, the dotted circle, or under the rim. Five spots are marked on the arc: both corners, both wings, and the top. A passer is at the elbow or free-throw line with balls. On a verbal cue (“LEFT!” “TOP!” “RIGHT!”), the shooter sprints to that spot, catches, and fires. The shooter doesn’t know which spot until the call — forcing reactive movement, just like a game.
Shooter
Passer
Spot
▲ Cone
Sprint, Plant, Catch : The moment the call comes, sprint at 100%. As you approach the spot, decelerate with choppy steps — don’t slide past the line. Plant your inside foot, pivot to face the basket, and show your hands. The passer delivers the ball as you arrive — not before (too early = standing still) and not after (too late = rhythm broken). Your feet should be set as the ball touches your hands. Catch and shoot in one motion.
Shooter
Passer
Spot
▲ Cone
Random Rotation : The passer (or coach) randomizes the call order — never the same pattern twice. “RIGHT! TOP! LEFT! RIGHT! LEFT! TOP!” The shooter must react and sprint to a new spot every 5-6 seconds. This trains reactive decision-making AND shooting off movement. Run 10-rep sets, rest 45 seconds, then go again. 3 sets = 30 reps at full intensity.
Shooter
Passer
Spot
▲ Cone

Add a Defender : The ultimate progression: add a live defender who starts in the paint and closes out when the call is made. Now the shooter must sprint, catch, and read: shoot over the closeout, pump-fake and drive, or one-dribble pull-up to the side. This turns a shooting drill into a full decision-making drill — the exact skill set required in games. Track shot selection AND make percentage.

Coaching Points
1 Sprint at 100% to the spot — the drill doesn’t work at 70%. Game speed or nothing.

2

Decelerate with choppy steps in the last 3 feet — don’t slide past the three-point line


3

Inside foot plants first, then the outside foot comes even — the 1-2 step creates a balanced base
 
 
4 Eyes find the rim DURING your sprint, not after you catch — this saves 0.3 seconds

5

The passer must time the delivery: pass should arrive as the shooter plants, not before or after
 
 
6 This drill doubles as conditioning — if you’re not exhausted, you’re not sprinting hard enough
Performance Benchmarks
Result

Assessment

55%+ off sprint
Elite game shooter
45-54% off sprint
Solid — your legs are strong enough
35-44%
Your shot breaks down when tired — build leg strength
<35%
Slow down your sprint to 80% and rebuild the catch mechanics
Game Transfer
Volume plus pace. You’re taking game-speed reps in high volume — your body learns the shooting motion through repetition, not conscious thought. By rep 80, your form is automatic. That’s the goal: shoot without thinking.
The Fatigue Factor
By the third set, your legs are burning and your heart rate is elevated. This is when the real training happens — you’re learning to shoot with tired legs, which is how every second-half three-pointer feels. If you can hit 55% while gasping, you can hit 40% in a game. Virtually every D1 program runs a version of Celtic Shooting. Villanova, UConn, Duke, and Gonzaga all use 7-spot rapid-fire drills as the backbone of their shooting development. It’s the single most common shooting drill in college basketball.

03

— Partner 21
Competitive
Partner
Pressure
Catch & Shoot

Two shooters compete head-to-head, each on their own side of the arc. First to 21 points wins — with three-pointers worth 3 and free throws worth 1. Every miss has a consequence. This is the drill that turns practice shooters into game shooters, because every single shot carries competitive weight.

8-12

Minutes

40-60

Attempts

2-4

Players

3PT Arc

Range

Medium

Intensity

Race

Format

Shooter
Passer
Spot
▲ Cone
Setup : Two shooters, each with their own rebounder/passer. Player A works the left side of the arc (left corner, left wing, left elbow). Player B works the right side (right corner, right wing, right elbow). Each player shoots from their 3 spots in any order they choose. Made three = 3 points. The first player to reach exactly 21 wins.
Shooter
Passer
Spot
▲ Cone

Scoring & Penalties : Made three = 3 points. If you miss 2 threes in a row, you must shoot a free throw before continuing. Make the FT = no penalty. Miss the FT = lose 1 point. This creates cascading pressure: a cold streak costs you points AND time, while your opponent keeps shooting. You must go to exactly 21 — if you go over, your score resets to 15.

Shooter
Passer
Spot
▲ Cone

Strategic Decisions : You choose which spot to shoot from. Do you camp on your hot spot (corner) and race to 21? Or do you force yourself to mix in your cold spots to build range? In practice, coaches often REQUIRE 2 makes from each spot before you can go back to your favorite. This prevents players from hiding in their comfort zone while still keeping the competition fierce.

Shooter
Passer
Spot
▲ Cone

Overtime Rule : If both players reach 18+ within one shot of each other, it’s overtime. Both players move to the top of the key. Alternate shots — if you make and your opponent misses, you win. If you both make, continue. If you both miss, continue. First player to have a make when their opponent misses takes the game. This creates a penalty-kick-style pressure situation that builds elite clutch shooting.

Coaching Points
1 The competitive structure forces you to shoot under pressure — every shot matters to the score

2

Don’t rush: the race is not about shooting speed, it’s about shooting PERCENTAGE. Slow is fast.

3

If you’re down, don’t panic — cold streaks end. Stay with your routine.
 4 The free-throw penalty teaches consequence: compounding mistakes is the enemy of winning
5
The “must hit 21 exactly” rule creates fascinating late-game pressure at 18, 19, and 20

6 Track your W-L record over a season — it’s a direct indicator of your competitive shooting growth
Performance Benchmarks
Result

Assessment

55%+ off sprint
Elite game shooter
45-54% off sprint
Solid — your legs are strong enough
35-44%
Your shot breaks down when tired — build leg strength
<35%
Slow down your sprint to 80% and rebuild the catch mechanics
Game Transfer
Volume plus pace. You’re taking game-speed reps in high volume — your body learns the shooting motion through repetition, not conscious thought. By rep 80, your form is automatic. That’s the goal: shoot without thinking.
The Fatigue Factor
By the third set, your legs are burning and your heart rate is elevated. This is when the real training happens — you’re learning to shoot with tired legs, which is how every second-half three-pointer feels. If you can hit 55% while gasping, you can hit 40% in a game. Virtually every D1 program runs a version of Celtic Shooting. Villanova, UConn, Duke, and Gonzaga all use 7-spot rapid-fire drills as the backbone of their shooting development. It’s the single most common shooting drill in college basketball.

04

— The Curry Drill
Off-Dribble
Combo
Elite
Advanced

Inspired by Steph Curry’s pre-game routine. This drill combines off-the-dribble threes with catch-and-shoot threes in a continuous, high-intensity cycle. Dribble combo into a pull-up three, sprint to a new spot for a catch-and-shoot three, repeat. It trains the two ways elite shooters score from deep — off the bounce and off the catch — in a single, exhausting drill.

12

Minutes

70+

Attempts

2-3

Players

3PT Arc

Range

Extreme

Intensity

50%+

Target

Shooter
Passer
Spot
▲ Cone
Phase 1 — Off-the-Dribble Three : Start at the three-point line. Execute a dribble combination move (crossover, between-the-legs, behind-the-back) into a step-back or pull-up three. The cone at the elbow simulates a defender — attack the cone, then create space and fire. This is the hardest three-pointer: creating your own shot from distance. 3 reps from the current spot.
Shooter
Passer
Spot
▲ Cone
Continuous Cycle : The pattern repeats: (1) Dribble three at the top. (2) Sprint to the paint. (3) Sprint to the left wing for a catch-and-shoot three. (4) Dribble three at the left wing. (5) Sprint to the paint. (6) Sprint to the right wing for a catch-and-shoot three. One full cycle = 6 threes (3 off-dribble, 3 catch-and-shoot). Do 3-4 cycles. Total: 18-24 threes per set, under absolute physical duress.
Shooter
Passer
Spot
▲ Cone
Elite Progression : Add a live defender for the dribble-three phase. The defender plays the cone role but reacts — now you must read: is the step-back open? Should I cross over the other way? Is the pull-up three available or do I need to drive? The catch-and-shoot phase stays the same (no defender on the catch). This combo trains both scoring modes with maximum game realism.
Coaching Points
1 The dribble moves must be SHARP — sloppy handles mean sloppy shots. Control the ball first.
On the step-back: push off the front foot, land balanced, shoot immediately. No gather-step, no hesitation.
3 The sprint between phases is at 100% — your heart rate should be maxed when you catch for the three
4 On the catch-and-shoot: your footwork must be pre-set. Turn your body during the sprint, not after the catch.
5 If your off-dribble percentage drops below 35%, slow down the dribble moves and refine the pull-up mechanics
6 This drill should leave you gasping. If it doesn’t, you’re not sprinting hard enough between shots.
Scoring Standards
Result

Assessment

55%+ combined
Steph Curry level — you can create AND catch-and-shoot
45-54% combined
D1 starting guard caliber
35-44%
Good catch-and-shoot, needs off-dribble work

<35%

Separate the phases — master each before combining
Why This Drill Exists
Modern basketball demands guards who can score from three in BOTH ways — off the catch and off the dribble. The Curry Drill trains both modes in one continuous, high-intensity package. If you can only shoot catch-and-shoot threes, defenses will take that away. If you can only shoot off the dribble, you’re one-dimensional. This drill makes you complete.
The Physical Demand

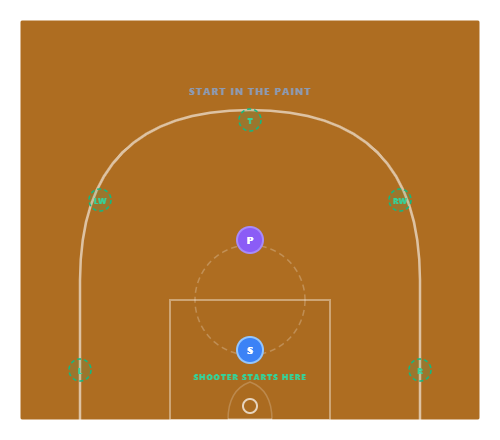
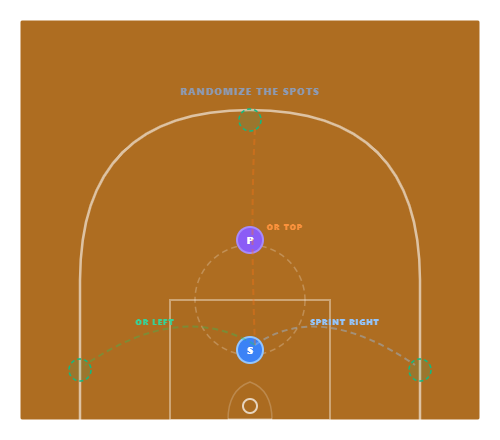
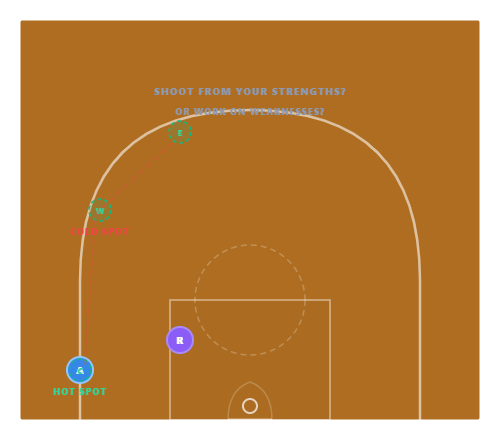
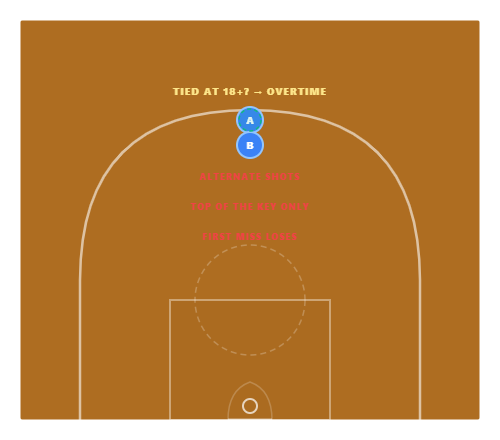
This is the most physically demanding shooting drill in basketball. The combination of explosive dribble moves, full-court sprints, and shooting accuracy under fatigue mirrors the demands of a 40-minute college game. Your legs will burn. Your lungs will scream. And your shot will become bulletproof.

05

— 3-2-1 Countdown
Pressure
Clutch
Mental
Progressive
A progressive pressure drill that simulates the escalating stakes of a basketball game. You start with 3 attempts to make a three. Then 2 attempts. Then just 1 attempt. Each round, the margin for error shrinks — exactly like the end of a close game when every shot matters more. This drill builds the mental steel that defines clutch shooters.

8

Minutes

30-40

Attempts

1-3

Players

3PT Arc

Range

Low (Extreme Mental)

Intensity

Mental

Target

Shooter
Passer
Spot
▲ Cone

Round 1 — Three Attempts : Pick a spot on the arc. You get 3 attempts to make one three-pointer. This is the warm-up round — the pressure is low. Three chances feels comfortable. Use your full routine: receive the pass, set your feet, breathe, shoot. If you make one of three, you advance to Round 2. If you miss all three, start over from Round 1.

Shooter
Passer
Spot
▲ Cone
Round 2 — Two Attempts: : Move to a new spot. Now you only get 2 attempts to make one three. The pressure ratchets up — one miss and you’re on your last shot. This is where your routine matters most. Don’t rush. Don’t change anything. Same catch, same feet, same release. If you make one of two, advance to Round 3. Miss both, restart at Round 1. The restart is the punishment that creates real stakes.
Shooter
Passer
Spot
▲ Cone
Round 3 — One Attempt : Move to your third spot. One shot. Make or miss. This is the game-winning three with the clock running out. Everything you’ve practiced — your routine, your mechanics, your breathing — comes down to this single rep. Make it and you’ve completed the cycle. Miss it and you restart from Round 1, Round of 3. The psychological weight of this shot is enormous, and that’s exactly the point.
Shooter
Passer
Spot
▲ Cone
Full Cycle Goal : Complete 3 full cycles (Round 1 → Round 2 → Round 3 made) to “master” the drill for the day. Change the three spots each cycle so you’re shooting from 9 different spots total. Track how many total attempts it takes to complete all 3 cycles. Elite standard: complete 3 cycles in under 25 total attempts. The fewer restarts, the more clutch you are.
Coaching Points

1

Your pre-shot routine is your anchor — use the EXACT same routine on the Round-of-1 shot as the Round-of-3


2

Breathe. Take a full breath before the Round-of-1 shot. Slow your heart rate intentionally.


3

Don’t think about the miss penalty while shooting — focus only on the front of the rim


4

After a restart: don’t change anything. The miss wasn’t mechanical — it was mental. Trust your shot.


5 The drill exposes who handles pressure and who folds — track your restart rate over time
6 Simulate a crowd: have teammates shout, clap, or count down “3… 2… 1…” on the final shot
Clutch Rating
Result

Assessment

3 cycles in <20 attempts
Ice cold — elite clutch shooter
3 cycles in 20-28 attempts

Strong — handles pressure well

3 cycles in 29-40 attempts
Developing — routine needs reinforcement under pressure
3 cycles in 40+ attempts
Mental reps needed — the restart is rattling you. Build confidence at Round 1 first.
The Psychology
This drill trains the most important shooting skill that no other drill addresses: the ability to perform when the margin for error is zero. Round-of-3 is relaxed. Round-of-2 is tense. Round-of-1 is a free throw with the season on the line. By cycling through this progression daily, your brain learns that pressure is normal — and your body stops reacting to it.
Clutch Data
Track your “restart rate” — how often you fail a round and go back to the start. Over a month, this number should decrease. A player who goes from 5 restarts per session to 1-2 has made a massive mental leap. This data is more valuable than your raw three-point percentage.