Interactive breakdowns of how to attack, overload, and dismantle zone defenses in college basketball. Find the gaps, move the ball, and make the zone pay.
Step 1: Identify the Zone
Before you can beat a zone, you have to recognize it. Click each zone type to see its formation and weaknesses.
Zone Defenders Weak Spots
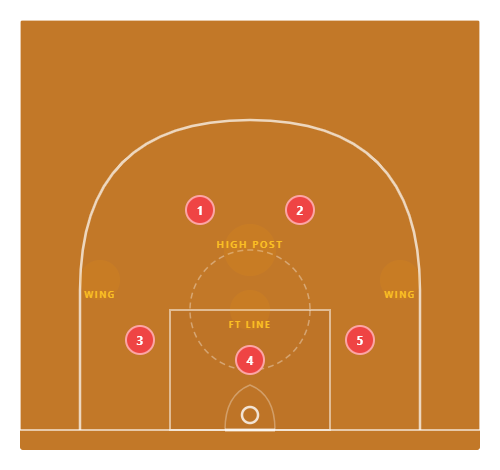
2-3 Zone Weaknesses : Vulnerable at the high post (free-throw line), the wings/short corners, and the gaps between the top two and bottom three defenders. Attack with a high post flash, skip passes corner-to-corner, and short corner action.
Zone Defenders Weak Spots
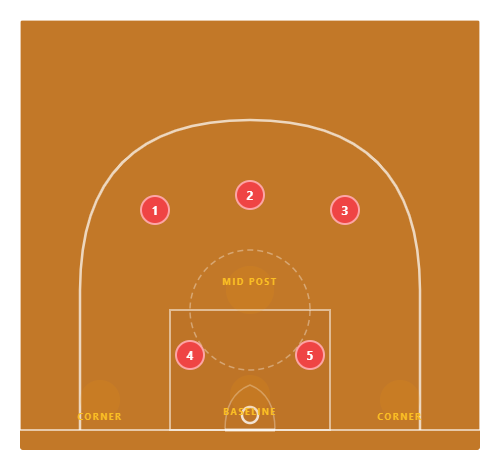
3-2 Zone Weaknesses : Wide open corners and baseline. The three-across-the-top coverage leaves the low blocks and corners exposed. Attack by swinging the ball to the corners and putting a player in the mid-post gap between the two low defenders.
Zone Defenders Weak Spots
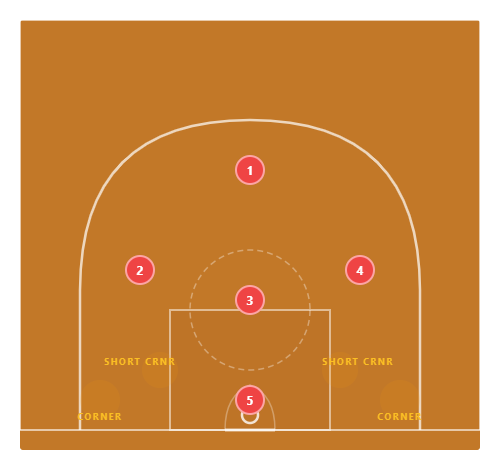
1-3-1 Zone Weaknesses : Both corners are completely open — the single baseline defender can’t cover both. The short corners (between the wing and baseline) are also exploitable. Quick ball reversal from corner to corner destroys this zone.
Zone Defenders Weak Spots
1-2-2 Zone Weaknesses : The high post area is wide open above the two elbow defenders. Wings between the elbow and baseline players are also vulnerable. Flash a big to the high post and make quick decisions before the zone can collapse.
1
Recognize
Count defenders up top vs. bottom to identify the zone type within 2 seconds
2
Find Gaps
Every zone has seams — the spaces between two defenders' areas of responsibility
3
Attack Gaps
Put a player in the gap. When two defenders are responsible, neither fully commits
4
Move It
The ball must move faster than the zone can shift. Quick, decisive passes — never hold the ball
Offensive Concepts
These principles work against any zone. Click each concept to see the alignment and ball movement.
Offense Defense Ball
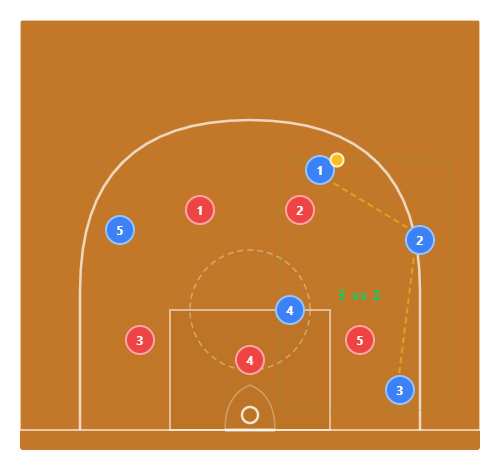
Overload : Put three offensive players on one side of the floor against only two zone defenders. Someone is always open. The ball moves: top → wing → corner. The zone can’t cover all three spots with two defenders. The key: the 4-man at the high post is the release valve if the defense overreacts.
Offense Defense Ball
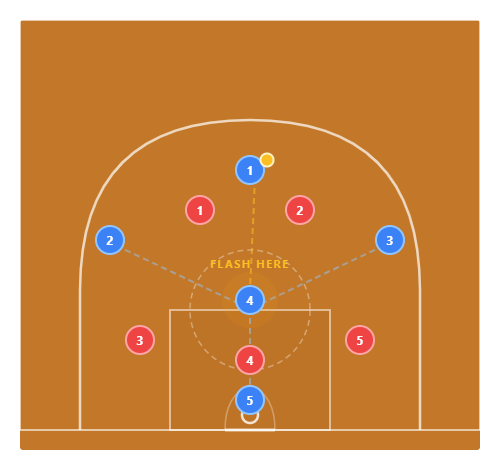
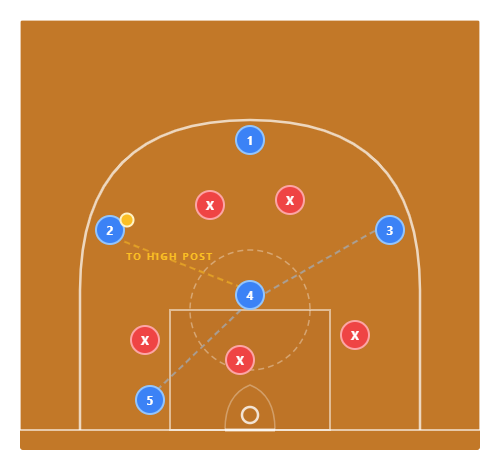
High Post Flash : The 4-man flashes to the free-throw line — the soft spot of the 2-3 zone. When they catch, BOTH top defenders and the middle baseline defender are pulled toward the ball. This creates open shooters on the wings and a high-low pass to the 5 on the block. The high post player must catch, face, and read within 1 second.
Offense Defense Ball
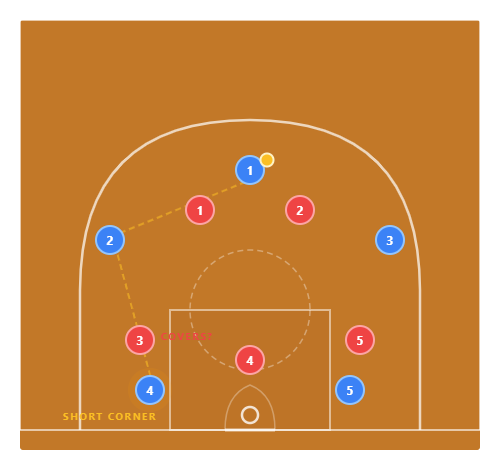
Short Corner: The short corner — the area between the block and the corner — sits in the seam between two zone defenders. Against a 2-3, the bottom wing (X3) and the middle baseline (X4) both think the other should cover it. Put a player here and make them decide. Whoever covers leaves their area open.
Offense Defense Ball
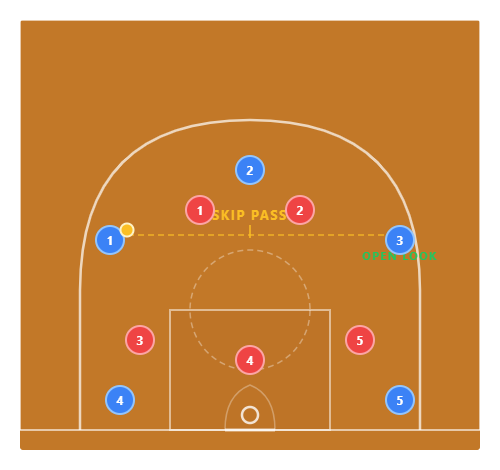
Skip Pass: The zone shifts toward the ball. When it shifts far enough to one side, throw it over the top to the opposite wing. This “skip pass” travels faster than the zone can shift back. The receiving player often has an open three or a free drive. The key: throw it early and on a rope — lob skip passes get picked off.
Offense Defense Ball
Dribble Gap Entry : Instead of passing into the zone, the point guard dribbles directly into the gap between the two top defenders. Both must react — one commits to the ball, one sags. This draws two defenders to one player, opening a kick-out pass to either wing. Be decisive: attack hard, then dish.
Move People, Not Just the Ball
A zone defends areas, not people. When offensive players cut through zones, defenders have to decide: follow the cutter or stay home? Both choices create openings.
Inside-Out Game
The quickest way to crack a zone is to get the ball inside first. A pass to the high post or short corner collapses the zone — then kick it out for an open three.
Don't Stand Still
A zone thrives when the offense is static. Constant movement — cutting, screening, flashing — forces the zone to react. A stationary offense lets the zone reset every time.
Zone-Busting Set Plays
Proven set plays designed to attack specific zones. Click each play, then step through the actions.
Offense Defense Ball
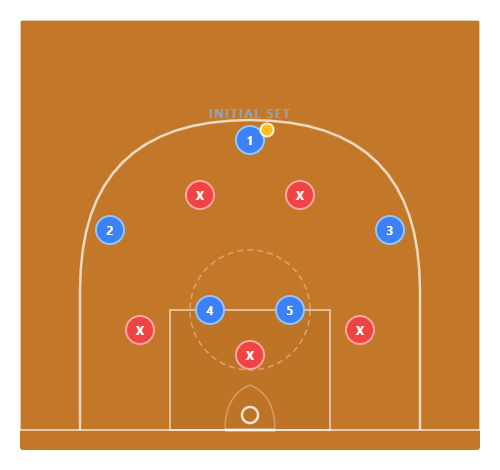
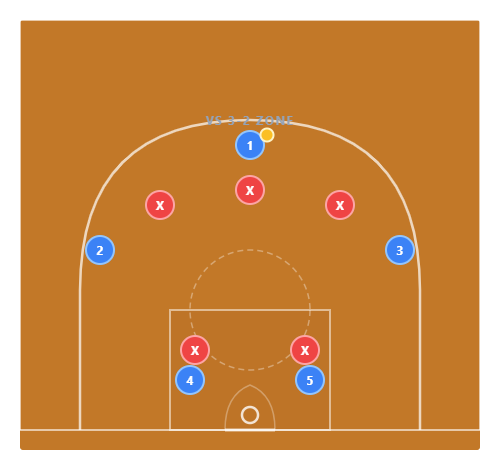
Fist — Step 1 : Initial alignment vs. the 2-3 zone. 1 has the ball up top. 4 and 5 are at the elbows. 2 and 3 are on the wings. The 4 and 5 at the elbows occupy the gap between the top and bottom of the zone.
Offense Defense Ball
Fist — Step 2 : 5 dives from the elbow to the short corner/block. 4 stays at the free-throw line. 1 passes to 2 on the wing. The zone starts to shift — X3 has to decide: follow 5 to the block or stay on the wing?
Offense Defense Ball
Fist — Step 3 (READ): 2 passes to 4 at the high post. The zone collapses. 4 reads: if X4 sags to the paint, hit 5 on the block for a layup. If the zone stays high, 4 finds the open wing (3) for a three. High post is the decision-maker.
Offense Defense Ball
Torch — Step 1: Against the 3-2 zone, the corners are open. 4 and 5 position low to stretch the two bottom defenders. 1 has the ball up top facing three across the arc.
Offense Defense Ball
Torch — Step 2 : 4 and 5 flash to the corners — the 3-2 zone’s biggest weakness. The two low defenders are now stretched sideline to sideline. 1 passes to 2 on the wing, pulling the zone left.
Offense Defense Ball
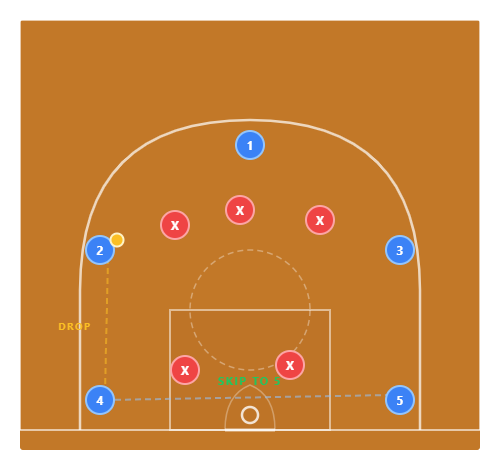
Torch — Step 3: 2 drops it to 4 in the corner. X4 must cover — but 5 is wide open in the opposite corner. 4 fires a skip pass to 5 for an open three. The zone can’t recover across the floor in time. If 5 is covered, the ball reverses and the offense resets with the advantage.
Offense Defense Ball
Spider — Step 1: Against the 1-3-1, occupy both corners immediately. The single baseline defender (X5) can only guard one corner at a time. 4 and 5 camp in the corners and wait for the ball.
Offense Defense Ball
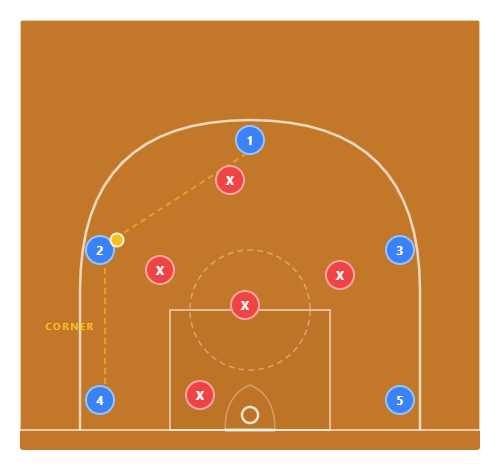
Spider — Step 2 : 1 passes to 2 on the wing. The 1-3-1 shifts — X2 moves to cover, X5 slides toward the ball-side corner. 2 quickly drops the ball to 4 in the corner before X5 arrives.
Offense Defense Ball
Spider — Step 3: 4 catches in the corner. The entire zone has shifted left. 4 reads: skip to 5 in the far corner for a wide-open 3, or pass to the middle of the zone (X3’s vacated area) for a high-low. The 1-3-1 is cracked wide open.
Offense Defense Ball
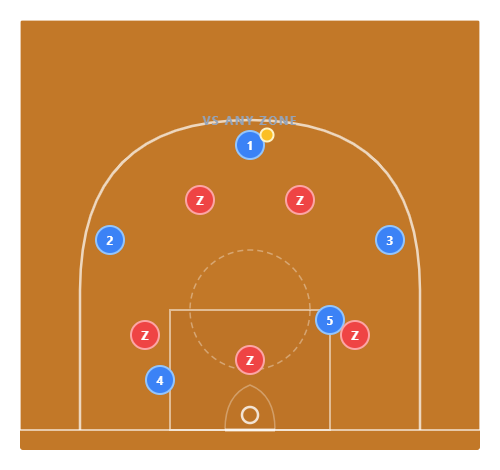
Overload 4 — Step 1 : A universal zone-buster. Start with 5 at the ball-side elbow and 4 in the ball-side short corner. This puts 4 offensive players on one side against 3 zone defenders — an automatic numbers advantage. Works against any zone.
Offense Defense Ball
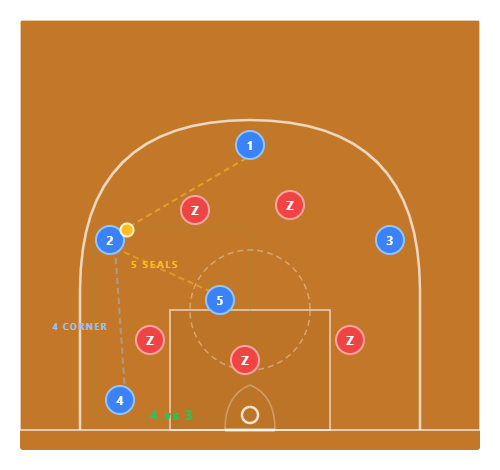
Overload 4 — Step 2 : 1 passes to 2 on the wing. Now the reads begin: 2 can hit 5 at the elbow (if the middle defender is low), dump to 4 in the corner (if the baseline slides to the block), or drive the gap. Three defenders, four attackers — someone is always open.
Offense Defense Ball
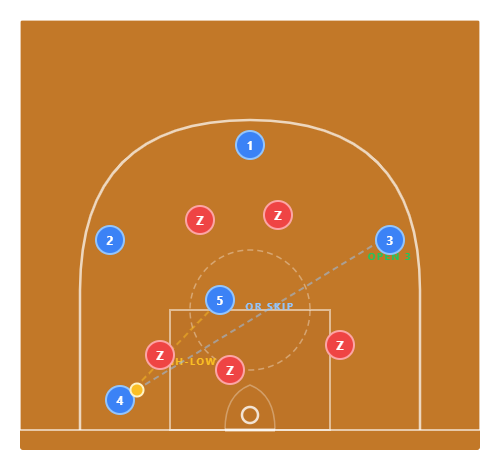
Overload 4 — Step 3 (The Kill): If the ball reaches 4 in the corner, the zone collapses ball-side. 4 has the highest-value reads: lob to 5 rolling to the rim (high-low), or fire a skip pass to 3 on the weak side for an open three. The zone is broken — take what they give you.
Offense Defense Ball
Fist — Step 1 : Initial alignment vs. the 2-3 zone. 1 has the ball up top. 4 and 5 are at the elbows. 2 and 3 are on the wings. The 4 and 5 at the elbows occupy the gap between the top and bottom of the zone.
Offense Defense Ball
Fist — Step 2 : 5 dives from the elbow to the short corner/block. 4 stays at the free-throw line. 1 passes to 2 on the wing. The zone starts to shift — X3 has to decide: follow 5 to the block or stay on the wing?
Offense Defense Ball
Fist — Step 3 (READ): 2 passes to 4 at the high post. The zone collapses. 4 reads: if X4 sags to the paint, hit 5 on the block for a layup. If the zone stays high, 4 finds the open wing (3) for a three. High post is the decision-maker.
Offense Defense Ball
Torch — Step 1: Against the 3-2 zone, the corners are open. 4 and 5 position low to stretch the two bottom defenders. 1 has the ball up top facing three across the arc.
Offense Defense Ball
Torch — Step 2 : 4 and 5 flash to the corners — the 3-2 zone’s biggest weakness. The two low defenders are now stretched sideline to sideline. 1 passes to 2 on the wing, pulling the zone left.
Offense Defense Ball
Torch — Step 3: 2 drops it to 4 in the corner. X4 must cover — but 5 is wide open in the opposite corner. 4 fires a skip pass to 5 for an open three. The zone can’t recover across the floor in time. If 5 is covered, the ball reverses and the offense resets with the advantage.
Offense Defense Ball
Spider — Step 1: Against the 1-3-1, occupy both corners immediately. The single baseline defender (X5) can only guard one corner at a time. 4 and 5 camp in the corners and wait for the ball.
Offense Defense Ball
Spider — Step 2 : 1 passes to 2 on the wing. The 1-3-1 shifts — X2 moves to cover, X5 slides toward the ball-side corner. 2 quickly drops the ball to 4 in the corner before X5 arrives.
Offense Defense Ball
Spider — Step 3: 4 catches in the corner. The entire zone has shifted left. 4 reads: skip to 5 in the far corner for a wide-open 3, or pass to the middle of the zone (X3’s vacated area) for a high-low. The 1-3-1 is cracked wide open.
Offense Defense Ball
Overload 4 — Step 1 : A universal zone-buster. Start with 5 at the ball-side elbow and 4 in the ball-side short corner. This puts 4 offensive players on one side against 3 zone defenders — an automatic numbers advantage. Works against any zone.
Offense Defense Ball
Overload 4 — Step 2 : 1 passes to 2 on the wing. Now the reads begin: 2 can hit 5 at the elbow (if the middle defender is low), dump to 4 in the corner (if the baseline slides to the block), or drive the gap. Three defenders, four attackers — someone is always open.
Offense Defense Ball
Overload 4 — Step 3 (The Kill): If the ball reaches 4 in the corner, the zone collapses ball-side. 4 has the highest-value reads: lob to 5 rolling to the rim (high-low), or fire a skip pass to 3 on the weak side for an open three. The zone is broken — take what they give you.
Timing Is Everything
A great zone play falls apart if the cutter is early or the pass is late. Practice the timing, not just the spots. The ball and the players must arrive at the same moment.
Read, Don't Robot
Set plays give structure, but the best zone offenses read the defense and react. If the play creates an early opening, take it — don't run the play for the sake of running it.
Practice Drills
Build the habits that make zone offenses automatic. Click to expand each drill.
01 5-on-0 Zone Spots
Walk through offensive alignment vs. each zone type (2-3, 3-2, 1-3-1)
Players pass the ball around the zone's perimeter — every player must touch it
On the coach's whistle, players find and stand in the "gaps" between zone areas
Builds spatial awareness of where the open spots are against each zone
2 minutes per zone type, rotate through all three
02Ball Reversal Speed Drill
5 offensive players in a semicircle behind the arc vs. 5 chairs (simulating a zone)
Ball must go from one wing to the other in 3 passes or fewer within 3 seconds
Practice skip passes, high post relays, and swing-swing sequences
Goal: move the ball faster than the zone can shift — create the open window
10 reps each direction, then add live zone defenders
03High Post Touch Drill
Player at the free-throw line receives the ball against a 2-3 zone
On the catch, two defenders collapse — the passer must read and hit the open man
High post player works on catch, face up, and quick decisions: shoot, pass high-low, or kick out
Rotate through all 5 players at the high post position
Score: 1pt for an assist from the high post, 2pts for a high-post score
04Short Corner 2-Man Game
Wing player and short corner player work a 2-man game against the bottom of a 2-3 zone
Wing drives baseline → short corner player reads: lift to the corner or dive to the rim
If the baseline defender helps on the drive, short corner is open for the kick
If the baseline defender stays, the driver has a lane
8 reps per side, switch roles
055-on-5 Zone Live — Shot Clock
Full 5-on-5 half court. Defense plays zone. Offense has a 20-second shot clock.
Offense must get a paint touch before shooting a three — no early pull-ups
Defense scores 2pts for a stop, offense scores 2pts for a paint bucket, 3pts for a kick-out three
Rotate zone types every 5 possessions so offense must adjust on the fly
First team to 15 wins — losers run a suicide
By the Numbers
Why attacking the zone properly leads to some of the highest-efficiency offense in college basketball.
3PT% vs Zone (Good O)
~38%
3PT% vs Man (Avg)
~38%
Paint FG% vs Zone
~55%
PPP (Good Zone O)
~1.12
PPP (Bad Zone O)
~0.7%
% Teams Using Zone
~40%
The 4-Point Edge
Well-prepared zone offenses shoot about 4% better from three against zones than against man defense. Why? Zone gaps create open looks if you move the ball.
Paint Touches = Points
Teams that average 10+ paint touches per 5 minutes against zones score ~1.12 PPP. Teams that settle for the perimeter? Just 0.78 PPP. Get it inside first.
The Fatigue Factor
Press teams expend massive energy. If you break the press consistently through the first half, the pressing team's defense degrades significantly in the second half. Patience beats pressure.
Ball Reversal Effect
Shots taken after 2+ ball reversals against a zone are ~8% more efficient than shots after 0 reversals. Moving the ball side to side creates the breakdowns you need.