The drills that build elite shooters. From form shooting to game-speed reps, click any drill to see the setup on the court, step-by-step execution, and coaching points.
01
Form Shooting
Form
Warm-Up
Fundamentals
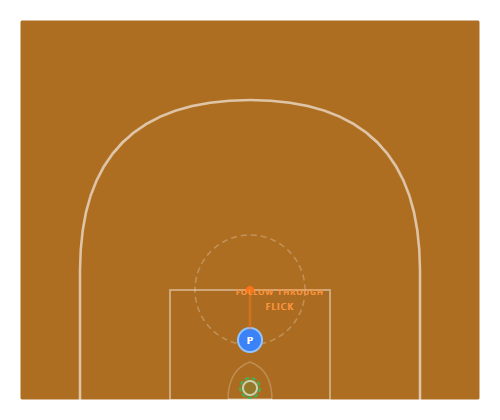
The most important drill in basketball. Stand 3-5 feet from the basket and shoot with one hand, focusing purely on mechanics — elbow alignment, follow-through, backspin, and arc. Every college practice starts here.
5
Minutes
50+
Reps
1
Players
3-5 ft
Range
Low
Intensity
Player Passer Spot▲ Cone
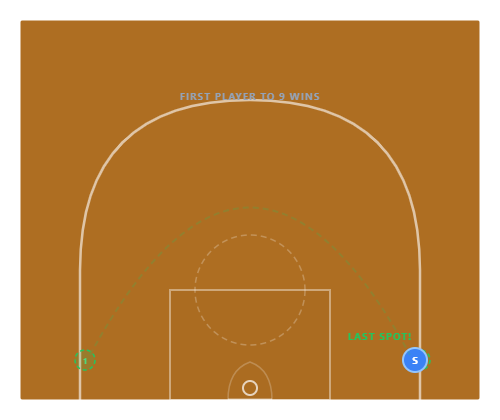
Setup : The inbounder (IB) takes the ball on the baseline under your own basket. Players 1, 2, and 3 are stacked near half court — acting as decoys and screeners. Player 5 (your best deep catcher) is positioned near the far free-throw line. The three players at half court will screen for 5 to get open near the basket.
Player Passer Spot▲ Cone
Execution: Shoot with one hand. Elbow under the ball, wrist cocked back, fingers spread. Push up through your legs and flick the wrist — hold the follow-through (the “cookie jar”). The ball should have perfect backspin and arc above the rim. 10 makes in a row, then switch to full shooting motion with the guide hand.
Player Passer Spot▲ Cone
Progress: After one-hand makes, add the guide hand and shoot normally from 3-5 feet — still no dribble, just catch-and-shoot rhythm. Then move to 45-degree angles on both sides. 10 makes from each spot. Total: 50+ perfect-form reps before moving to any other drill.
Coaching Points
Elbow directly under the ball — not flared out
Follow through: wrist snaps down, fingers point at the rim
Ball should come off the index and middle finger last
Perfect backspin with 2-3 rotations
Hold your follow-through until the ball hits the net
Every rep must be intentional — no lazy shots
Why Fundamentals First
Every shooting flaw originates from bad form. If your mechanics are broken at 5 feet, they're broken at 25 feet. Form shooting resets your muscle memory before every practice.
College Standard
Spend 5 minutes on stance, hit-and-seal, and chin-the-ball at the START of every practice. These movements must be automatic — in a game, you have 0.5 seconds to react to a shot. There's no time to think.
02
Mikan Drill
Form
Layups
Touch
Named after George Mikan. A rapid-fire alternating layup drill using both hands. Builds ambidextrous finishing, touch around the rim, and the habit of keeping the ball high. Every college player does this daily.
3
Minutes
30+
Reps
1
Players
Rim
Range
Medium
Intensity
Player Passer Spot▲ Cone
Setup : Stand on the left side of the basket, ball in both hands. Start with a left-hand layup off the backboard. Use the glass — aim for the top corner of the square on the backboard. No dribble — just catch and shoot in continuous rhythm.
Player Passer Spot▲ Cone
Execution: After the left-hand layup, grab the ball out of the net (don’t let it hit the ground), step to the right side, and immediately shoot a right-hand layup. Left, right, left, right — continuous, rapid alternation. Keep the ball high above your head at all times — never bring it below your chin.
Player Passer Spot▲ Cone
Tempo: Goal: make as many layups as possible in 30 seconds. Elite college players make 15+ in 30 seconds. Do 3-4 sets with 20-second rest between. Progression: add reverse layups, baby hooks, and power finishes using the same alternating pattern.
Coaching Points
Keep the ball above your head at all times — high and strong
Use the backboard on every shot — aim for the top corner of the square
Alternate hands without hesitation — left, right, left, right
Jump off the correct foot: left-hand layup = right foot takeoff
Challenge: 15+ makes in 30 seconds is the D1 benchmark
Progression: add reverse Mikans and hook shot Mikans
Why It Matters
Finishing with both hands is non-negotiable at the college level. The Mikan Drill builds ambidextrous touch, trains correct footwork, and develops soft hands around the rim.
Variations
Reverse Mikans (finish on the opposite side of the backboard), power Mikans (two-foot jump stop), and extended Mikans (from the dotted circle area).
03
5-Spot Shooting
Spot-Up
3PT
Reps
The bread-and-butter shooting drill. Five spots around the three-point arc — corner, wing, top of the key, wing, corner. A passer feeds the shooter at each spot. Simple, high-volume, and exactly how most threes are created in games.
10
Minutes
100+
Reps
2
Players
3PT
Range
Medium
Intensity
Player Passer Spot▲ Cone
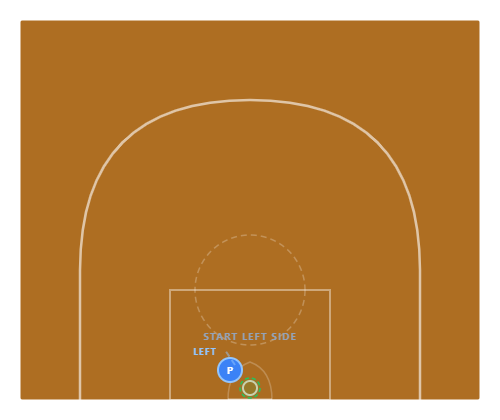
Setup : Five spots marked around the three-point arc: both corners, both wings, and the top of the key. A passer (or rebounder/passer) is in the paint. The shooter starts at spot 1 (right corner). Shoot a set number from each spot, then rotate.
Player Passer Spot▲ Cone
Setup : Five spots marked around the three-point arc: both corners, both wings, and the top of the key. A passer (or rebounder/passer) is in the paint. The shooter starts at spot 1 (right corner). Shoot a set number from each spot, then rotate.
Player Passer Spot▲ Cone
Scoring: Common formats: (A) Make 3 out of 5 at each spot to advance. (B) “Perfects” — must make 5 in a row to move on. (C) Timed — how many makes in 2 minutes? Track your percentage at each spot daily. D1 standard: 70%+ from every spot in practice.
Coaching Points
Feet squared to the basket BEFORE the catch — don't turn after catching
Hands up and ready — "show your target" to the passer
Catch the ball on the way up, not on the way down
Same release point, same follow-through on every single shot
Track your makes and misses at each spot — data drives improvement
Game speed: catch and release within 0.8 seconds
The Standard
College shooters aim for 70%+ from all five spots in practice. In games, catch-and-shoot threes off a pass convert at ~38-42% for elite teams. Practice percentage should be nearly double game percentage.
Variations
Add a "game-speed closeout" — the passer simulates a defender closing out after each pass, forcing the shooter to decide: shoot, pump-fake drive, or one-dribble pull-up.
04
Around the World
Spot-Up
Competitive
Classic
The classic competitive shooting game. Shoot from 7-9 spots around the arc in sequence. Make it, advance. Miss it, decide: stay or gamble on a second shot. Miss the gamble, go back to the start. A drill and a competition in one.
8
Minutes
Varies
Shots
2-4
Players
3PT
Range
Low
Intensity
Player Passer Spot▲ Cone
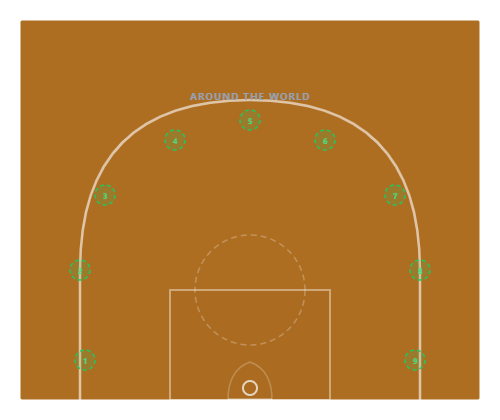
Setup : 7-9 spots in an arc from baseline to baseline, following the three-point line. Players start at spot 1 (right baseline). Each player shoots in turn. Make your shot → advance to the next spot. Miss → choose: STAY at the current spot, or GAMBLE with a second attempt.
Player Passer Spot▲ Cone
The Gamble: If you miss, you have two choices: (1) STAY — keep your position and wait for your next turn. (2) GAMBLE — immediately shoot again. If you make the gamble shot, advance. If you miss the gamble, go ALL THE WAY BACK to spot 1. High risk, high reward. This teaches shot selection and mental toughness.
Player Passer Spot▲ Cone
Win Condition: First player to make it through all 9 spots and back wins. Going “around the world” means shooting through all spots in order, reaching the far baseline, then coming back. The return trip adds pressure — you’re close to winning but one gamble-miss sends you back to the start.
Coaching Points
Teaches shot selection: when to take a good shot and when to pass (stay)
Builds mental toughness — the gamble decision mirrors game situations
Track how many "trips" (completions) each player makes per session
Add a dribble requirement: one-dribble pull-up from each spot for variation
D1 teams use this as a warm-up competition to build intensity before practice
Loser runs — add consequences to make the competition meaningful
Coaching Value
Around the World teaches risk assessment. In games, players must decide: take the contested three or pass? This drill builds that decision-making muscle in a competitive environment.
Time Pressure
Add a shot clock: each player has 5 seconds per shot. If time expires, it's an automatic miss. This simulates late-clock pressure shooting.
05
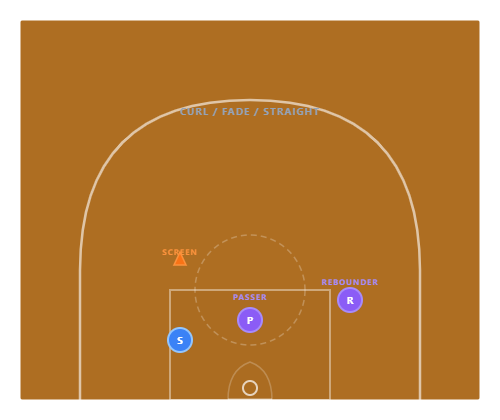
Curl / Fade / Straight
Off-Screen
Read
Game Speed
The definitive off-screen shooting drill. A shooter uses a screen and must read the defense to decide: curl tight for a layup, fade to the corner for a three, or come straight off for a mid-range. Three reads, one drill.
8
Minutes
60+
Shots
3
Players
Mid/3PT
Range
High
Intensity
Player Passer Spot▲ Cone
Setup : cone (simulating a screener) is placed at the wing/elbow area. The shooter starts below the cone on the baseline side. A passer is at the top of the key with balls. A rebounder is under the basket. The coach calls “CURL,” “FADE,” or “STRAIGHT” as the shooter approaches the screen.
Player Passer Spot▲ Cone
Three Reads:CURL: Defender goes over the screen → cut tight around it toward the basket for a layup or short floater. FADE: Defender goes under → fade away from the screen to the corner for an open three. STRAIGHT: Defender gets caught → come straight off the screen to the wing for a catch-and-shoot mid-range or three.
Coaching Points
Sprint to the screen — game speed only. No walking off screens in games.
Set up your defender before using the screen — "sell" a cut one direction, then go another
On the curl: keep the inside shoulder low, cut tight to the screener's hip
On the fade: push off the screen foot and open your hips to the passer immediately
On the straight: square your feet to the basket as you clear the screen
The passer must deliver to the RIGHT spot — curl pass goes low, fade pass goes high and away
Game Translation
In a real game, the shooter decides which read to use based on the defender's positioning. This drill trains all three reads so the decision becomes instinctive — you don't think, you react.
Progression
Add a live defender instead of a cone. Now the shooter must read the actual defense, not a coach's call. This is the highest-level version of the drill.
06
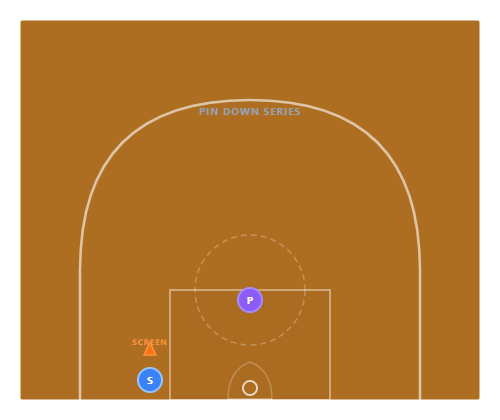
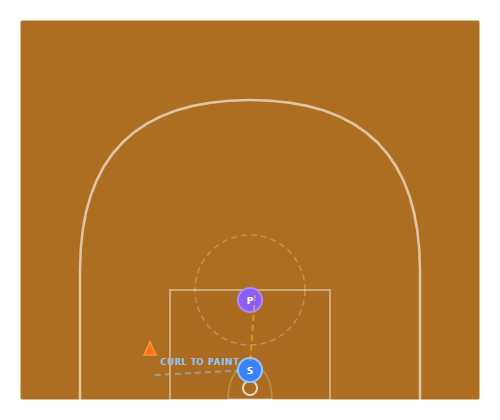
Pin Down Series
Off-Screen
Pin Down
Catch & Shoot
A shooter uses a pin-down (down screen) from a big man at the block, pops to the wing or elbow, and catches for a shot. Replicates the most common off-ball screening action in man-to-man offense — used 15-20 times per game.
8
Minutes
50+
Shots
3
Players
Mid/3PT
Range
High
Intensity
Player Passer Spot▲ Cone
Setup : Cone at the wing/block area simulating the screener. Shooter starts below the screen on the baseline. Passer is at the top of the key or the opposite wing. Shooter will use the pin-down screen and pop to the wing for a catch-and-shoot.
Player Passer Spot▲ Cone
Curl Variation: Instead of popping wide, the shooter curls tight around the screen and cuts to the paint for a floater or short pull-up. This teaches the shooter to read: if the defender trails over the screen, pop. If the defender goes under, curl. Same screen, two different finishes — game-ready decision-making.
Coaching Points
Set up the cut by walking your defender down toward the baseline before using the screen
Brush the screener's shoulder — run tight to the screen, not wide around it
Hands ready and up before the catch — be in your shooting stance as the ball arrives
Call for the ball with a hand target — show the passer where you want it
Sprint, don't jog — in games, the separation only lasts 0.5 seconds
After popping: catch, 1-2 rhythm step, shoot. No wasted motion.
Game Translation
The pin-down screen is the most common off-ball screen in college basketball. Guards use 10-15 pin-down screens per game. Mastering this drill directly translates to game scoring.
Live Version
Add a live defender who must fight through the screen. Now the shooter reads: pop if the defender goes over, curl if they go under, re-screen if they switch.
07
Flare Screen Drill
Off-Screen
Flare
Difficult
The hardest catch-and-shoot in basketball — shooting while moving AWAY from the basket off a flare screen. Requires elite footwork to catch moving laterally, plant, square up, and fire. Separates good shooters from great ones.
6
Minutes
40+
Shots
3
Players
3PT
Range
High
Intensity
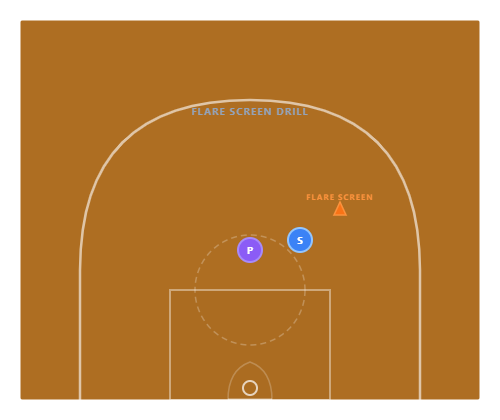
Player Passer Spot▲ Cone
Setup : Cone at the wing area simulating a flare screener. Shooter starts near the elbow, inside the screen. Passer is at the top of the key or the point guard area. The shooter will cut off the flare screen moving AWAY from the ball, catch on the move, and shoot.
Player Passer Spot▲ Cone
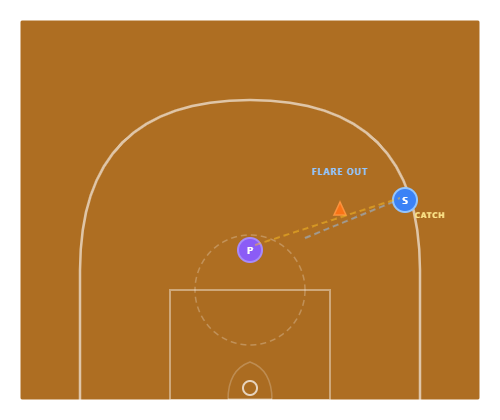
Flare & Catch: Shooter runs off the flare screen moving toward the sideline — away from the passer. The passer throws a skip-style pass to the shooter’s outside shoulder. The shooter must catch while moving laterally, plant the inside foot, square up to the basket, and shoot — all in one fluid motion. This is a rhythm shot — don’t stop and re-set.
Player Passer Spot▲ Cone
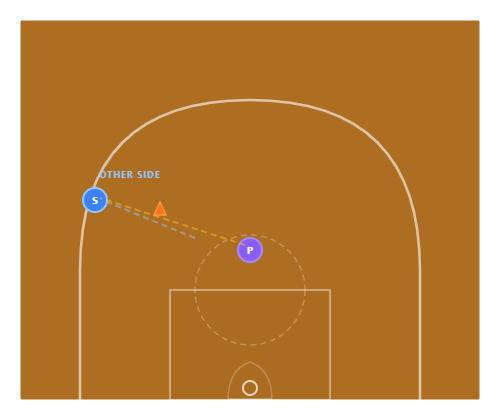
Both Sides: Repeat from the other side of the floor. 5 reps flaring right, 5 reps flaring left. The footwork is different on each side — the inside foot (closest to the basket) is always the pivot foot. Track makes from each side separately — most shooters have a weak side on flare catches.
Coaching Points
The inside foot is the pivot — plant it as you catch, then square your hips to the basket
Keep your hands above your waist as you run off the screen — ready to catch high
The passer must lead the shooter — pass to where they're going, not where they are
Don't fade away on the shot — resist the lateral momentum and go UP
This is the toughest catch-and-shoot angle: practice it more, not less
Elite shooters like Steph Curry and Klay Thompson shoot 40%+ off flare screens
Why It's Hard
Flare shots require catching while moving laterally, then redirecting your momentum upward into the shot. Your body wants to fade — you must fight that instinct and rise straight up.
Game Value
Flare screen threes are among the highest-value shots in basketball because defenses rarely recover in time. If you can hit this shot, you're unguardable off-ball.
08
Pull-Up Jumper Series
Off-Dribble
Mid-Range
Guard Skill
The shot that separates college guards from high school guards. Dribble once from the three-point line, pull up at the elbow or free-throw line, and shoot a mid-range jumper. Trains the footwork, balance, and touch for the most important guard shot in basketball.
10
Minutes
60+
Shots
1-2
Players
Mid
Range
Medium
Intensity
Player Passer Spot▲ Cone
Setup : Start at the top of the three-point line. One hard dribble toward the basket. Pull up at the free-throw line for a mid-range jumper. Focus on the 1-2 step: inside foot plants first, then the outside foot comes even, and you rise straight up. No drifting, no fading.
Player Passer Spot▲ Cone
Wing Pull-Ups: From each wing, one hard dribble toward the elbow. Pull up for the mid-range. Practice from both sides — right-hand dribble from the right wing, left-hand from the left. 10 makes from each wing. The wing pull-up is the most common shot in college basketball after the catch-and-shoot three.
Player Passer Spot▲ Cone
Crossover Pull-Up: Add a crossover dribble before the pull-up. Start at the top, crossover left-to-right (or right-to-left), one hard dribble, pull up. The crossover creates space — the pull-up capitalizes on it. This is the shot that defines elite college guards. 10 makes each direction.
Coaching Points
The 1-2 step is critical: inside foot hits first, shoulders square to the basket on the second step
Don't jump forward — go straight UP. Drifting causes misses.
The ball should come to your shooting pocket as your feet set — timing is everything
Practice at 75% speed first, then build to game speed as the footwork becomes natural
Keep your eyes on the rim from the moment you pick up the dribble — don't look at the ball
This shot is your bailout when the defense takes away the three and the drive — master it
Game Context
The pull-up jumper is the most valuable shot in crunch time because it's almost impossible to block and doesn't depend on teammates. Every great college guard — from Jalen Brunson to Markus Howard — lived off this shot.
Efficiency
The mid-range pull-up converts at 40-45% for elite guards. That's lower than a layup, but it's always available — no screen needed, no open look required. It's your independent scoring weapon.
09
Step-Back Three
Off-Dribble
3PT
Advanced
The modern guard’s signature move. Dribble toward the defender, then step back behind the three-point line and fire. Creates separation without needing a screen or a teammate. Requires elite balance, leg strength, and shot preparation.
8
Minutes
50+
Shots
1-2
Players
3PT
Range
High
Intensity
Player Passer Spot▲ Cone
Mechanics: Start just inside the three-point line. Take 1-2 dribbles toward the basket (attacking). Then push off the front foot, step BACK behind the arc, and shoot immediately. Your weight should transfer from moving forward to balanced on the step back. The shot comes off the back foot’s momentum.
Player Passer Spot▲ Cone
Both Wings: Practice from both wings — step-back going left, step-back going right. 10 makes from each side. The footwork changes: from the right wing, you push off the left foot and step back to the right. From the left wing, push off the right foot and step back to the left. Both must be automatic.Practice from both wings — step-back going left, step-back going right. 10 makes from each side. The footwork changes: from the right wing, you push off the left foot and step back to the right. From the left wing, push off the right foot and step back to the left. Both must be automatic.
Player Passer Spot▲ Cone
With a Cone: Place a cone 3 feet inside the arc as a simulated defender. Dribble toward the cone, then step back. The cone teaches you to attack close enough to freeze the defender before stepping back. If you start the step-back too far from the defender, they’ll close out before you shoot. Get close first, then create space.
Coaching Points
Attack forward first — you must sell the drive to freeze the defender before stepping back
Push off your front foot explosively — weak step-backs don't create enough separation
Land balanced on both feet — no drifting sideways. Balance = accuracy.
The ball comes to your shooting pocket DURING the step-back, not after
Your eyes find the rim the instant your feet leave the ground — look up early
Practice slow first. The step-back is about timing and balance, not speed.
Modern Weapon
The step-back three has become the most important shot in modern basketball. James Harden popularized it in the NBA, but college guards like Chris Livingston and Caleb Love have made it a staple at the D1 level.
Efficiency Warning
The step-back three is a low-percentage shot (~30-33% even for good shooters). Use it when you NEED a three and can't get an open catch-and-shoot. Don't abuse it — save it for when you need to create your own shot.
10
3-Cone Shooting
Off-Dribble
Cones
Handles
Combines ball handling with shooting. Dribble through three cones (simulating defenders), then pull up for a jumper. Trains the transition from “attack mode” to “shooting mode” — the hardest skill for developing scorers.
10
Minutes
50+
Shots
1
Players
Mid/3PT
Range
High
Intensity
Player Passer Spot▲ Cone
Setup: Three cones staggered from the arc to the elbow area. Start at the three-point line. Dribble through each cone with a change-of-direction move (crossover, between the legs, or behind the back), then pull up for a mid-range jumper after the last cone. Game speed required.
Player Passer Spot▲ Cone
Move Combinations:Each cone gets a different move. Cone 1: crossover. Cone 2: between the legs. Cone 3: hesitation into the pull-up. Vary the combinations: behind-the-back, spin move, in-and-out. The key: your last dribble must put you in shooting position — not scrambling for balance.
Player Passer Spot▲ Cone
Vary the Angle: Run the 3-cone drill from different starting points — top of the key, both wings, the corners. Each angle requires different footwork on the pull-up. 5 makes from each starting point. Track your percentage — the angle you shoot worst from is the one you need to practice most.
Coaching Points
Keep your head up through the cones — eyes on the rim, not the ball
The last dribble is the most important: it must be a "power dribble" that puts the ball in your shooting pocket
Change pace, not just direction — slow to fast is more effective than fast to fast
Land on balance after the pull-up — if you're drifting, you dribbled too fast through the cones
This drill builds the handle-to-shot transition that separates scorers from ball handlers
Time yourself: complete all cones + make in under 5 seconds for game-speed simulation
Skill Transfer
In games, you rarely pull up from a stationary position — you're always coming off dribble moves. This drill trains the exact muscle memory of "attack with the dribble, then score with the jumper."
Guard Essential
Every D1 guard should spend 10 minutes daily on dribble-to-shot drills. The ability to create your own shot off the dribble is the single most valuable guard skill in college basketball.
11
Free Throw Routine
Form
Free Throws
Pressure
Free throws win and lose games. This drill builds a repeatable routine and trains shooting under simulated pressure — fatigue, consequences, and counting. The goal: make your free throw as automatic as blinking.
10
Minutes
50+
Shots
1-5
Players
FT Line
Range
Low
Intensity
Player Passer Spot▲ Cone
Build the Routine: Stand at the free-throw line. Develop YOUR routine — the same steps every single time. Example: receive the ball, spin it to your shooting hand, take two dribbles, deep breath, eyes on the front of the rim, shoot. The routine must be identical on rep 1 and rep 1,000. Consistency breeds accuracy.
Player Passer Spot▲ Cone
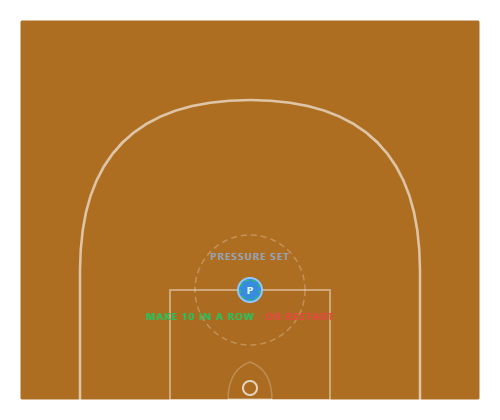
Pressure Reps:Make 10 free throws in a row. If you miss at any point, restart the count at zero. This adds real pressure — when you’re at 8 in a row, the 9th feels like a game-winner. Track how many attempts it takes to reach 10 in a row. D1 standard: complete 10-in-a-row within 15 total attempts.
Player Passer Spot▲ Cone
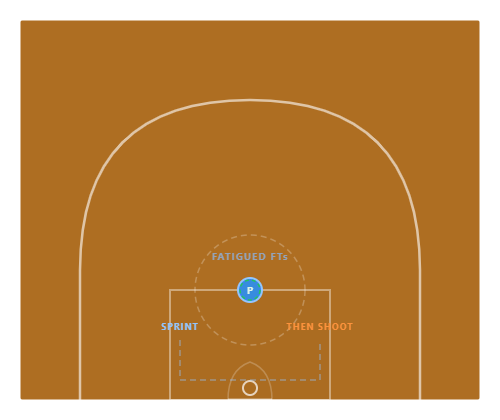
Fatigue FTs: Sprint baseline to baseline, then immediately shoot 2 free throws. This simulates game conditions — you’re never fresh at the line in a real game. Repeat 10 times (20 total FTs). Track your percentage while fatigued. If you shoot 80%+ fresh but 65% tired, your routine isn’t strong enough.
Coaching Points
The routine is non-negotiable — same steps, same rhythm, every single time
Take a deep breath before every shot to slow your heart rate
Focus on the front of the rim — not the back, not the whole basket, the front edge
Your free throw should feel identical to your form shooting from 5 feet — same mechanics
Shoot 50-100 free throws per practice minimum — volume builds consistency
Track your percentage daily. 75%+ is acceptable, 80%+ is good, 85%+ is elite at the D1 level
The Numbers
Free throws account for ~20% of all scoring in college basketball. A team that shoots 75% vs. 65% from the line gains approximately 3-4 points per game — often the margin of victory.
Mental Training
The free throw is the only shot in basketball with zero physical defense. It's 100% mental. Your routine is your anchor — it makes the shot feel the same whether it's practice or the Final Four.
12
Transition 3 Drill
Spot-Up
Transition
Conditioning
Simulates catching a three in transition — sprinting up the floor, spotting up, and shooting before the defense recovers. Combines conditioning with shooting. The transition three is the highest-percentage shot in basketball when done right.
8
Minutes
40+
Shots
2-3
Players
3PT
Range
Very High
Intensity
Player Passer Spot▲ Cone
setup: Shooter starts under the basket (simulating a rebound or made basket). Passer is at half court or the elbow with balls. Three spots are marked: left wing, top of key, right wing. On “GO,” the shooter sprints to a spot and catches for a three.
Player Passer Spot▲ Cone
Rotate:Sprint to the left wing, shoot. Sprint back to the baseline. Sprint to the top of the key, shoot. Sprint back. Sprint to the right wing, shoot. Sprint back. That’s one cycle — do 3-4 cycles. Track makes out of total. You’re shooting while your heart rate is elevated — exactly like a game.
Coaching Points
Sprint at 100% — the whole point is learning to shoot with an elevated heart rate
Plant your inside foot first, then bring the outside foot even — same 1-2 footwork as catch-and-shoot
Show your hands early so the passer can deliver on time — communication is key
Transition threes convert at ~38% for prepared teams — they're the best shot in basketball
This drill doubles as conditioning — your legs will burn, and that's the point
After 3 cycles, you should be gasping. If you're not, you're not sprinting hard enough.
Statistical Edge
Teams that shoot well in transition score ~1.2 points per possession — far above the D1 average of ~1.0. The transition three is the most efficient shot in the sport because the defense hasn't set up.
Physical Demand
This drill is as much about conditioning as shooting. Tired legs = missed threes. Building your shooting endurance means hitting shots in the 2nd half when other teams' legs are gone.
13
Beat the Pro
Competitive
Pressure
Mental
You vs. an imaginary “Pro.” Every make is +1 for you. Every miss is +2 for the Pro. Shoot from 5 spots, 2 shots per spot. Can you beat the Pro? This drill adds consequence to every single shot and builds clutch shooting under pressure.
8
Minutes
10
Shots
1
Players
3PT
Range
Low (High Mental)
Intensity
Player Passer Spot▲ Cone
Rules: Five spots around the arc. Shoot 2 shots from each spot (10 total). Every MAKE gives YOU 1 point. Every MISS gives the PRO 2 points. You must outscore the Pro. To beat the Pro, you need to make at least 7 out of 10. Making 6 means you tie (6 pts vs. 8 pts). 5 or fewer = you lose.
Player Passer Spot▲ Cone
The Pressure:You’ve made 4 and missed 1 through 2.5 spots. You’re up 4-2. But that miss cost you double — every miss stings twice as hard. As you approach the last spots, the math gets tight. If you miss 2 in a row, the Pro takes the lead. This creates real, tangible pressure on every single shot.
Player Passer Spot▲ Cone
Closing:You’re 7 for 9 heading to the last shot. You’re up 7-4. Even if you miss the last one, you win 7-6. But can you close it out? After tracking your Beat the Pro results daily, you’ll see your performance under back-end pressure improve dramatically. The last 2 shots are where the mental growth happens.
Coaching Points
The math forces you to shoot 70%+ to beat the Pro — that IS the D1 standard
Track your daily results: W/L record against the Pro over a month tells you your clutch shooting trend
Do NOT rush through the drill — treat each shot like a game shot with a full routine
When you can beat the Pro consistently, make it harder: +3 per miss instead of +2
This drill builds the habit of not compounding mistakes — one miss can't become two
It's the best solo drill in basketball for building mental toughness in shooting
Mental Training
Beat the Pro creates consequence for every shot. In games, every miss costs your team. This drill trains your brain to treat practice shots with game-level focus.
Progression
Level 1: +1 make, +2 miss. Level 2: +1 make, +3 miss (need 8/10). Level 3: add a free throw after every miss (miss the FT = +1 more for the Pro). Level 4: add a dribble move before each shot.
14
21-Cones
Competitive
Team
High Volume
A full-team competitive shooting drill. 21 cones are placed on the court — each cone represents a shooting spot. Players rotate through, and each make removes a cone. The team must “clear the floor” of all 21 cones. Miss and the cone stays. Race against the clock.
12
Minutes
100+
Shots
5-15
Players
All
Range
High
Intensity
Player Passer Spot▲ Cone
Setup: Place 21 cones around the court — on the three-point line, mid-range, in the paint, at the free-throw line. Every cone is a shooting spot. Players line up. One at a time, each player goes to ANY cone, shoots from that spot. Make it = remove the cone. Miss it = the cone stays. Next player goes immediately.e.
Player Passer Spot▲ Cone
The Race: The clock is running. As cones are removed, the floor clears up. But the hard spots remain — the ones everyone misses. Players must make strategic decisions: go to the easy spots first, or attack the tough ones while you’re fresh? Team communication matters: “I’ll take the corner, you hit the elbow!”
Player Passer Spot▲ Cone
The Finish:Down to the last few cones. Pressure mounts — everyone is watching. Can the team clear the floor? Set a time target: “Clear 21 cones in under 4 minutes.” If they beat the clock, no running. If they don’t, the team runs. Track the time daily — watch it drop as the team’s shooting improves.
Coaching Points
This drill creates team accountability — your miss affects the whole team
Players learn to shoot from uncomfortable spots, not just their favorites
The time pressure simulates late-game shooting situations
Coaches can weight certain spots: "three-pointers require 2 makes to remove the cone"
Rotate the cone placements every week to prevent comfort zones
The last 3-4 cones are the hardest — they build mental toughness under team pressure
Team Building
21-Cones is one of the best team-building shooting drills because every player's performance affects the group. When the 12th man steps up and knocks down a tough spot, the whole team celebrates. It builds collective confidence.
Coaching Tool
Track which cones are removed first (team strengths) and which remain the longest (weaknesses). Use this data to design targeted practice for weak spots.
15
Closeout Shooting
Competitive
Closeout
Game Speed
The ultimate game-simulation shooting drill. A defender closes out on the shooter at full speed. The shooter must read the closeout and decide in 0.5 seconds: shoot the three, pump-fake and drive, or one-dribble pull-up. Real decisions, real speed, real shooting.
12
Minutes
60+
Shots
3-4
Players
3PT/Mid
Range
Very High
Intensity
Player Passer Spot▲ Cone
Setup: Passer in the paint with balls. Shooter on the wing at the three-point line. Defender starts in the paint, near the passer. When the pass is thrown, the defender sprints to close out on the shooter. The shooter must catch and make a decision BEFORE the defender arrives: shoot, drive, or pull-up.
Player Passer Spot▲ Cone
The Read: Three reads based on the closeout: (1) Defender closes SHORT (stops before reaching the shooter) → SHOOT the open three. (2) Defender flies past (too aggressive) → PUMP FAKE and drive for a layup. (3) Defender arrives under control → ONE-DRIBBLE pull-up to the side. The shooter has 0.5 seconds to read and react — just like a game.
Player Passer Spot▲ Cone
Full Rotation:The shooter rotates through all 5 spots. At each spot: the passer throws, the defender closes, and the shooter reads. 3 reps at each spot (15 total possessions). Score: 3 points for a made three, 2 points for a made pull-up, 2 points for a made layup, 0 for a miss. Target: 25+ points out of 45. Track results.
Coaching Points
The defender must vary their closeout — sometimes short, sometimes hard, sometimes controlled. Mix it up.
Shooter: catch in your shooting stance EVERY time, even if you're going to drive — don't telegraph your decision
The pump-fake must be realistic — ball goes up to your forehead, eyes look at the rim, then drive
One-dribble pull-up is the hardest read — practice the footwork so it's automatic
This is the closest drill to game shooting — treat every rep like a live possession
Track shot selection: if you're driving when you should shoot (or vice versa), the data will show it
Game Simulation
Every college three is contested — the days of wide-open catch-and-shoot in practice translating to games are over. This drill trains the REAL skill: reading a closing defender and making the right play in 0.5 seconds.
Decision Training
Great shooters aren't just accurate — they make great decisions. This drill trains shot selection (should I shoot or drive?) just as much as it trains shooting mechanics. The best shooters take only good shots.
01
Form Shooting
Form
Warm-Up
Fundamentals
The most important drill in basketball. Stand 3-5 feet from the basket and shoot with one hand, focusing purely on mechanics — elbow alignment, follow-through, backspin, and arc. Every college practice starts here.
5
Minutes
50+
Reps
1
Players
3-5 ft
Range
Low
Intensity
Player Passer Spot▲ Cone
Setup : The inbounder (IB) takes the ball on the baseline under your own basket. Players 1, 2, and 3 are stacked near half court — acting as decoys and screeners. Player 5 (your best deep catcher) is positioned near the far free-throw line. The three players at half court will screen for 5 to get open near the basket.
Player Passer Spot▲ Cone
Execution: Shoot with one hand. Elbow under the ball, wrist cocked back, fingers spread. Push up through your legs and flick the wrist — hold the follow-through (the “cookie jar”). The ball should have perfect backspin and arc above the rim. 10 makes in a row, then switch to full shooting motion with the guide hand.
Player Passer Spot▲ Cone
Progress: After one-hand makes, add the guide hand and shoot normally from 3-5 feet — still no dribble, just catch-and-shoot rhythm. Then move to 45-degree angles on both sides. 10 makes from each spot. Total: 50+ perfect-form reps before moving to any other drill.
Coaching Points
Elbow directly under the ball — not flared out
Follow through: wrist snaps down, fingers point at the rim
Ball should come off the index and middle finger last
Perfect backspin with 2-3 rotations
Hold your follow-through until the ball hits the net
Every rep must be intentional — no lazy shots
Why Fundamentals First
Every shooting flaw originates from bad form. If your mechanics are broken at 5 feet, they're broken at 25 feet. Form shooting resets your muscle memory before every practice.
College Standard
Spend 5 minutes on stance, hit-and-seal, and chin-the-ball at the START of every practice. These movements must be automatic — in a game, you have 0.5 seconds to react to a shot. There's no time to think.
02
Mikan Drill
Form
Layups
Touch
Named after George Mikan. A rapid-fire alternating layup drill using both hands. Builds ambidextrous finishing, touch around the rim, and the habit of keeping the ball high. Every college player does this daily.
3
Minutes
30+
Reps
1
Players
Rim
Range
Medium
Intensity
Player Passer Spot▲ Cone
Setup : Stand on the left side of the basket, ball in both hands. Start with a left-hand layup off the backboard. Use the glass — aim for the top corner of the square on the backboard. No dribble — just catch and shoot in continuous rhythm.
Player Passer Spot▲ Cone
Execution: After the left-hand layup, grab the ball out of the net (don’t let it hit the ground), step to the right side, and immediately shoot a right-hand layup. Left, right, left, right — continuous, rapid alternation. Keep the ball high above your head at all times — never bring it below your chin.
Player Passer Spot▲ Cone
Tempo: Goal: make as many layups as possible in 30 seconds. Elite college players make 15+ in 30 seconds. Do 3-4 sets with 20-second rest between. Progression: add reverse layups, baby hooks, and power finishes using the same alternating pattern.
Coaching Points
Keep the ball above your head at all times — high and strong
Use the backboard on every shot — aim for the top corner of the square
Alternate hands without hesitation — left, right, left, right
Jump off the correct foot: left-hand layup = right foot takeoff
Challenge: 15+ makes in 30 seconds is the D1 benchmark
Progression: add reverse Mikans and hook shot Mikans
Why It Matters
Finishing with both hands is non-negotiable at the college level. The Mikan Drill builds ambidextrous touch, trains correct footwork, and develops soft hands around the rim.
Variations
Reverse Mikans (finish on the opposite side of the backboard), power Mikans (two-foot jump stop), and extended Mikans (from the dotted circle area).
11
Free Throw Routine
Form
Free Throws
Pressure
Free throws win and lose games. This drill builds a repeatable routine and trains shooting under simulated pressure — fatigue, consequences, and counting. The goal: make your free throw as automatic as blinking.
10
Minutes
50+
Shots
1-5
Players
FT Line
Range
Low
Intensity
Player Passer Spot▲ Cone
Build the Routine: Stand at the free-throw line. Develop YOUR routine — the same steps every single time. Example: receive the ball, spin it to your shooting hand, take two dribbles, deep breath, eyes on the front of the rim, shoot. The routine must be identical on rep 1 and rep 1,000. Consistency breeds accuracy.
Player Passer Spot▲ Cone
Pressure Reps:Make 10 free throws in a row. If you miss at any point, restart the count at zero. This adds real pressure — when you’re at 8 in a row, the 9th feels like a game-winner. Track how many attempts it takes to reach 10 in a row. D1 standard: complete 10-in-a-row within 15 total attempts.
Player Passer Spot▲ Cone
Fatigue FTs: Sprint baseline to baseline, then immediately shoot 2 free throws. This simulates game conditions — you’re never fresh at the line in a real game. Repeat 10 times (20 total FTs). Track your percentage while fatigued. If you shoot 80%+ fresh but 65% tired, your routine isn’t strong enough.
Coaching Points
The routine is non-negotiable — same steps, same rhythm, every single time
Take a deep breath before every shot to slow your heart rate
Focus on the front of the rim — not the back, not the whole basket, the front edge
Your free throw should feel identical to your form shooting from 5 feet — same mechanics
Shoot 50-100 free throws per practice minimum — volume builds consistency
Track your percentage daily. 75%+ is acceptable, 80%+ is good, 85%+ is elite at the D1 level
The Numbers
Free throws account for ~20% of all scoring in college basketball. A team that shoots 75% vs. 65% from the line gains approximately 3-4 points per game — often the margin of victory.
Mental Training
The free throw is the only shot in basketball with zero physical defense. It's 100% mental. Your routine is your anchor — it makes the shot feel the same whether it's practice or the Final Four.
03
5-Spot Shooting
Spot-Up
3PT
Reps
The bread-and-butter shooting drill. Five spots around the three-point arc — corner, wing, top of the key, wing, corner. A passer feeds the shooter at each spot. Simple, high-volume, and exactly how most threes are created in games.
10
Minutes
100+
Reps
2
Players
3PT
Range
Medium
Intensity
Player Passer Spot▲ Cone
Setup : Five spots marked around the three-point arc: both corners, both wings, and the top of the key. A passer (or rebounder/passer) is in the paint. The shooter starts at spot 1 (right corner). Shoot a set number from each spot, then rotate.
Player Passer Spot▲ Cone
Setup : Five spots marked around the three-point arc: both corners, both wings, and the top of the key. A passer (or rebounder/passer) is in the paint. The shooter starts at spot 1 (right corner). Shoot a set number from each spot, then rotate.
Player Passer Spot▲ Cone
Scoring: Common formats: (A) Make 3 out of 5 at each spot to advance. (B) “Perfects” — must make 5 in a row to move on. (C) Timed — how many makes in 2 minutes? Track your percentage at each spot daily. D1 standard: 70%+ from every spot in practice.
Coaching Points
Feet squared to the basket BEFORE the catch — don't turn after catching
Hands up and ready — "show your target" to the passer
Catch the ball on the way up, not on the way down
Same release point, same follow-through on every single shot
Track your makes and misses at each spot — data drives improvement
Game speed: catch and release within 0.8 seconds
The Standard
College shooters aim for 70%+ from all five spots in practice. In games, catch-and-shoot threes off a pass convert at ~38-42% for elite teams. Practice percentage should be nearly double game percentage.
Variations
Add a "game-speed closeout" — the passer simulates a defender closing out after each pass, forcing the shooter to decide: shoot, pump-fake drive, or one-dribble pull-up.
04
Around the World
Spot-Up
Competitive
Classic
The classic competitive shooting game. Shoot from 7-9 spots around the arc in sequence. Make it, advance. Miss it, decide: stay or gamble on a second shot. Miss the gamble, go back to the start. A drill and a competition in one.
8
Minutes
Varies
Shots
2-4
Players
3PT
Range
Low
Intensity
Player Passer Spot▲ Cone
Setup : 7-9 spots in an arc from baseline to baseline, following the three-point line. Players start at spot 1 (right baseline). Each player shoots in turn. Make your shot → advance to the next spot. Miss → choose: STAY at the current spot, or GAMBLE with a second attempt.
Player Passer Spot▲ Cone
The Gamble: If you miss, you have two choices: (1) STAY — keep your position and wait for your next turn. (2) GAMBLE — immediately shoot again. If you make the gamble shot, advance. If you miss the gamble, go ALL THE WAY BACK to spot 1. High risk, high reward. This teaches shot selection and mental toughness.
Player Passer Spot▲ Cone
Win Condition: First player to make it through all 9 spots and back wins. Going “around the world” means shooting through all spots in order, reaching the far baseline, then coming back. The return trip adds pressure — you’re close to winning but one gamble-miss sends you back to the start.
Coaching Points
Teaches shot selection: when to take a good shot and when to pass (stay)
Builds mental toughness — the gamble decision mirrors game situations
Track how many "trips" (completions) each player makes per session
Add a dribble requirement: one-dribble pull-up from each spot for variation
D1 teams use this as a warm-up competition to build intensity before practice
Loser runs — add consequences to make the competition meaningful
Coaching Value
Around the World teaches risk assessment. In games, players must decide: take the contested three or pass? This drill builds that decision-making muscle in a competitive environment.
Time Pressure
Add a shot clock: each player has 5 seconds per shot. If time expires, it's an automatic miss. This simulates late-clock pressure shooting.
12
Transition 3 Drill
Spot-Up
Transition
Conditioning
Simulates catching a three in transition — sprinting up the floor, spotting up, and shooting before the defense recovers. Combines conditioning with shooting. The transition three is the highest-percentage shot in basketball when done right.
8
Minutes
40+
Shots
2-3
Players
3PT
Range
Very High
Intensity
Player Passer Spot▲ Cone
setup: Shooter starts under the basket (simulating a rebound or made basket). Passer is at half court or the elbow with balls. Three spots are marked: left wing, top of key, right wing. On “GO,” the shooter sprints to a spot and catches for a three.
Player Passer Spot▲ Cone
Rotate:Sprint to the left wing, shoot. Sprint back to the baseline. Sprint to the top of the key, shoot. Sprint back. Sprint to the right wing, shoot. Sprint back. That’s one cycle — do 3-4 cycles. Track makes out of total. You’re shooting while your heart rate is elevated — exactly like a game.
Coaching Points
Sprint at 100% — the whole point is learning to shoot with an elevated heart rate
Plant your inside foot first, then bring the outside foot even — same 1-2 footwork as catch-and-shoot
Show your hands early so the passer can deliver on time — communication is key
Transition threes convert at ~38% for prepared teams — they're the best shot in basketball
This drill doubles as conditioning — your legs will burn, and that's the point
After 3 cycles, you should be gasping. If you're not, you're not sprinting hard enough.
Statistical Edge
Teams that shoot well in transition score ~1.2 points per possession — far above the D1 average of ~1.0. The transition three is the most efficient shot in the sport because the defense hasn't set up.
Physical Demand
This drill is as much about conditioning as shooting. Tired legs = missed threes. Building your shooting endurance means hitting shots in the 2nd half when other teams' legs are gone.
05
Curl / Fade / Straight
Off-Screen
Read
Game Speed
The definitive off-screen shooting drill. A shooter uses a screen and must read the defense to decide: curl tight for a layup, fade to the corner for a three, or come straight off for a mid-range. Three reads, one drill.
8
Minutes
60+
Shots
3
Players
Mid/3PT
Range
High
Intensity
Player Passer Spot▲ Cone
Setup : cone (simulating a screener) is placed at the wing/elbow area. The shooter starts below the cone on the baseline side. A passer is at the top of the key with balls. A rebounder is under the basket. The coach calls “CURL,” “FADE,” or “STRAIGHT” as the shooter approaches the screen.
Player Passer Spot▲ Cone
Three Reads:CURL: Defender goes over the screen → cut tight around it toward the basket for a layup or short floater. FADE: Defender goes under → fade away from the screen to the corner for an open three. STRAIGHT: Defender gets caught → come straight off the screen to the wing for a catch-and-shoot mid-range or three.
Coaching Points
Sprint to the screen — game speed only. No walking off screens in games.
Set up your defender before using the screen — "sell" a cut one direction, then go another
On the curl: keep the inside shoulder low, cut tight to the screener's hip
On the fade: push off the screen foot and open your hips to the passer immediately
On the straight: square your feet to the basket as you clear the screen
The passer must deliver to the RIGHT spot — curl pass goes low, fade pass goes high and away
Game Translation
In a real game, the shooter decides which read to use based on the defender's positioning. This drill trains all three reads so the decision becomes instinctive — you don't think, you react.
Progression
Add a live defender instead of a cone. Now the shooter must read the actual defense, not a coach's call. This is the highest-level version of the drill.
06
Pin Down Series
Off-Screen
Pin Down
Catch & Shoot
A shooter uses a pin-down (down screen) from a big man at the block, pops to the wing or elbow, and catches for a shot. Replicates the most common off-ball screening action in man-to-man offense — used 15-20 times per game.
8
Minutes
50+
Shots
3
Players
Mid/3PT
Range
High
Intensity
Player Passer Spot▲ Cone
Setup : Cone at the wing/block area simulating the screener. Shooter starts below the screen on the baseline. Passer is at the top of the key or the opposite wing. Shooter will use the pin-down screen and pop to the wing for a catch-and-shoot.
Player Passer Spot▲ Cone
Curl Variation: Instead of popping wide, the shooter curls tight around the screen and cuts to the paint for a floater or short pull-up. This teaches the shooter to read: if the defender trails over the screen, pop. If the defender goes under, curl. Same screen, two different finishes — game-ready decision-making.
Coaching Points
Set up the cut by walking your defender down toward the baseline before using the screen
Brush the screener's shoulder — run tight to the screen, not wide around it
Hands ready and up before the catch — be in your shooting stance as the ball arrives
Call for the ball with a hand target — show the passer where you want it
Sprint, don't jog — in games, the separation only lasts 0.5 seconds
After popping: catch, 1-2 rhythm step, shoot. No wasted motion.
Game Translation
The pin-down screen is the most common off-ball screen in college basketball. Guards use 10-15 pin-down screens per game. Mastering this drill directly translates to game scoring.
Live Version
Add a live defender who must fight through the screen. Now the shooter reads: pop if the defender goes over, curl if they go under, re-screen if they switch.
07
Flare Screen Drill
Off-Screen
Flare
Difficult
The hardest catch-and-shoot in basketball — shooting while moving AWAY from the basket off a flare screen. Requires elite footwork to catch moving laterally, plant, square up, and fire. Separates good shooters from great ones.
6
Minutes
40+
Shots
3
Players
3PT
Range
High
Intensity
Player Passer Spot▲ Cone
Setup : Cone at the wing area simulating a flare screener. Shooter starts near the elbow, inside the screen. Passer is at the top of the key or the point guard area. The shooter will cut off the flare screen moving AWAY from the ball, catch on the move, and shoot.
Player Passer Spot▲ Cone
Flare & Catch: Shooter runs off the flare screen moving toward the sideline — away from the passer. The passer throws a skip-style pass to the shooter’s outside shoulder. The shooter must catch while moving laterally, plant the inside foot, square up to the basket, and shoot — all in one fluid motion. This is a rhythm shot — don’t stop and re-set.
Player Passer Spot▲ Cone
Both Sides: Repeat from the other side of the floor. 5 reps flaring right, 5 reps flaring left. The footwork is different on each side — the inside foot (closest to the basket) is always the pivot foot. Track makes from each side separately — most shooters have a weak side on flare catches.
Coaching Points
The inside foot is the pivot — plant it as you catch, then square your hips to the basket
Keep your hands above your waist as you run off the screen — ready to catch high
The passer must lead the shooter — pass to where they're going, not where they are
Don't fade away on the shot — resist the lateral momentum and go UP
This is the toughest catch-and-shoot angle: practice it more, not less
Elite shooters like Steph Curry and Klay Thompson shoot 40%+ off flare screens
Why It's Hard
Flare shots require catching while moving laterally, then redirecting your momentum upward into the shot. Your body wants to fade — you must fight that instinct and rise straight up.
Game Value
Flare screen threes are among the highest-value shots in basketball because defenses rarely recover in time. If you can hit this shot, you're unguardable off-ball.
08
Pull-Up Jumper Series
Off-Dribble
Mid-Range
Guard Skill
The shot that separates college guards from high school guards. Dribble once from the three-point line, pull up at the elbow or free-throw line, and shoot a mid-range jumper. Trains the footwork, balance, and touch for the most important guard shot in basketball.
10
Minutes
60+
Shots
1-2
Players
Mid
Range
Medium
Intensity
Player Passer Spot▲ Cone
Setup : Start at the top of the three-point line. One hard dribble toward the basket. Pull up at the free-throw line for a mid-range jumper. Focus on the 1-2 step: inside foot plants first, then the outside foot comes even, and you rise straight up. No drifting, no fading.
Player Passer Spot▲ Cone
Wing Pull-Ups: From each wing, one hard dribble toward the elbow. Pull up for the mid-range. Practice from both sides — right-hand dribble from the right wing, left-hand from the left. 10 makes from each wing. The wing pull-up is the most common shot in college basketball after the catch-and-shoot three.
Player Passer Spot▲ Cone
Crossover Pull-Up: Add a crossover dribble before the pull-up. Start at the top, crossover left-to-right (or right-to-left), one hard dribble, pull up. The crossover creates space — the pull-up capitalizes on it. This is the shot that defines elite college guards. 10 makes each direction.
Coaching Points
The 1-2 step is critical: inside foot hits first, shoulders square to the basket on the second step
Don't jump forward — go straight UP. Drifting causes misses.
The ball should come to your shooting pocket as your feet set — timing is everything
Practice at 75% speed first, then build to game speed as the footwork becomes natural
Keep your eyes on the rim from the moment you pick up the dribble — don't look at the ball
This shot is your bailout when the defense takes away the three and the drive — master it
Game Context
The pull-up jumper is the most valuable shot in crunch time because it's almost impossible to block and doesn't depend on teammates. Every great college guard — from Jalen Brunson to Markus Howard — lived off this shot.
Efficiency
The mid-range pull-up converts at 40-45% for elite guards. That's lower than a layup, but it's always available — no screen needed, no open look required. It's your independent scoring weapon.
09
Step-Back Three
Off-Dribble
3PT
Advanced
The modern guard’s signature move. Dribble toward the defender, then step back behind the three-point line and fire. Creates separation without needing a screen or a teammate. Requires elite balance, leg strength, and shot preparation.
8
Minutes
50+
Shots
1-2
Players
3PT
Range
High
Intensity
Player Passer Spot▲ Cone
Mechanics: Start just inside the three-point line. Take 1-2 dribbles toward the basket (attacking). Then push off the front foot, step BACK behind the arc, and shoot immediately. Your weight should transfer from moving forward to balanced on the step back. The shot comes off the back foot’s momentum.
Player Passer Spot▲ Cone
Both Wings: Practice from both wings — step-back going left, step-back going right. 10 makes from each side. The footwork changes: from the right wing, you push off the left foot and step back to the right. From the left wing, push off the right foot and step back to the left. Both must be automatic.Practice from both wings — step-back going left, step-back going right. 10 makes from each side. The footwork changes: from the right wing, you push off the left foot and step back to the right. From the left wing, push off the right foot and step back to the left. Both must be automatic.
Player Passer Spot▲ Cone
With a Cone: Place a cone 3 feet inside the arc as a simulated defender. Dribble toward the cone, then step back. The cone teaches you to attack close enough to freeze the defender before stepping back. If you start the step-back too far from the defender, they’ll close out before you shoot. Get close first, then create space.
Coaching Points
Attack forward first — you must sell the drive to freeze the defender before stepping back
Push off your front foot explosively — weak step-backs don't create enough separation
Land balanced on both feet — no drifting sideways. Balance = accuracy.
The ball comes to your shooting pocket DURING the step-back, not after
Your eyes find the rim the instant your feet leave the ground — look up early
Practice slow first. The step-back is about timing and balance, not speed.
Modern Weapon
The step-back three has become the most important shot in modern basketball. James Harden popularized it in the NBA, but college guards like Chris Livingston and Caleb Love have made it a staple at the D1 level.
Efficiency Warning
The step-back three is a low-percentage shot (~30-33% even for good shooters). Use it when you NEED a three and can't get an open catch-and-shoot. Don't abuse it — save it for when you need to create your own shot.
10
3-Cone Shooting
Off-Dribble
Cones
Handles
Combines ball handling with shooting. Dribble through three cones (simulating defenders), then pull up for a jumper. Trains the transition from “attack mode” to “shooting mode” — the hardest skill for developing scorers.
10
Minutes
50+
Shots
1
Players
Mid/3PT
Range
High
Intensity
Player Passer Spot▲ Cone
Setup: Three cones staggered from the arc to the elbow area. Start at the three-point line. Dribble through each cone with a change-of-direction move (crossover, between the legs, or behind the back), then pull up for a mid-range jumper after the last cone. Game speed required.
Player Passer Spot▲ Cone
Move Combinations:Each cone gets a different move. Cone 1: crossover. Cone 2: between the legs. Cone 3: hesitation into the pull-up. Vary the combinations: behind-the-back, spin move, in-and-out. The key: your last dribble must put you in shooting position — not scrambling for balance.
Player Passer Spot▲ Cone
Vary the Angle: Run the 3-cone drill from different starting points — top of the key, both wings, the corners. Each angle requires different footwork on the pull-up. 5 makes from each starting point. Track your percentage — the angle you shoot worst from is the one you need to practice most.
Coaching Points
Keep your head up through the cones — eyes on the rim, not the ball
The last dribble is the most important: it must be a "power dribble" that puts the ball in your shooting pocket
Change pace, not just direction — slow to fast is more effective than fast to fast
Land on balance after the pull-up — if you're drifting, you dribbled too fast through the cones
This drill builds the handle-to-shot transition that separates scorers from ball handlers
Time yourself: complete all cones + make in under 5 seconds for game-speed simulation
Skill Transfer
In games, you rarely pull up from a stationary position — you're always coming off dribble moves. This drill trains the exact muscle memory of "attack with the dribble, then score with the jumper."
Guard Essential
Every D1 guard should spend 10 minutes daily on dribble-to-shot drills. The ability to create your own shot off the dribble is the single most valuable guard skill in college basketball.
13
Beat the Pro
Competitive
Pressure
Mental
You vs. an imaginary “Pro.” Every make is +1 for you. Every miss is +2 for the Pro. Shoot from 5 spots, 2 shots per spot. Can you beat the Pro? This drill adds consequence to every single shot and builds clutch shooting under pressure.
8
Minutes
10
Shots
1
Players
3PT
Range
Low (High Mental)
Intensity
Player Passer Spot▲ Cone
Rules: Five spots around the arc. Shoot 2 shots from each spot (10 total). Every MAKE gives YOU 1 point. Every MISS gives the PRO 2 points. You must outscore the Pro. To beat the Pro, you need to make at least 7 out of 10. Making 6 means you tie (6 pts vs. 8 pts). 5 or fewer = you lose.
Player Passer Spot▲ Cone
The Pressure:You’ve made 4 and missed 1 through 2.5 spots. You’re up 4-2. But that miss cost you double — every miss stings twice as hard. As you approach the last spots, the math gets tight. If you miss 2 in a row, the Pro takes the lead. This creates real, tangible pressure on every single shot.
Player Passer Spot▲ Cone
Closing:You’re 7 for 9 heading to the last shot. You’re up 7-4. Even if you miss the last one, you win 7-6. But can you close it out? After tracking your Beat the Pro results daily, you’ll see your performance under back-end pressure improve dramatically. The last 2 shots are where the mental growth happens.
Coaching Points
The math forces you to shoot 70%+ to beat the Pro — that IS the D1 standard
Track your daily results: W/L record against the Pro over a month tells you your clutch shooting trend
Do NOT rush through the drill — treat each shot like a game shot with a full routine
When you can beat the Pro consistently, make it harder: +3 per miss instead of +2
This drill builds the habit of not compounding mistakes — one miss can't become two
It's the best solo drill in basketball for building mental toughness in shooting
Mental Training
Beat the Pro creates consequence for every shot. In games, every miss costs your team. This drill trains your brain to treat practice shots with game-level focus.
Progression
Level 1: +1 make, +2 miss. Level 2: +1 make, +3 miss (need 8/10). Level 3: add a free throw after every miss (miss the FT = +1 more for the Pro). Level 4: add a dribble move before each shot.
14
21-Cones
Competitive
Team
High Volume
A full-team competitive shooting drill. 21 cones are placed on the court — each cone represents a shooting spot. Players rotate through, and each make removes a cone. The team must “clear the floor” of all 21 cones. Miss and the cone stays. Race against the clock.
12
Minutes
100+
Shots
5-15
Players
All
Range
High
Intensity
Player Passer Spot▲ Cone
Setup: Place 21 cones around the court — on the three-point line, mid-range, in the paint, at the free-throw line. Every cone is a shooting spot. Players line up. One at a time, each player goes to ANY cone, shoots from that spot. Make it = remove the cone. Miss it = the cone stays. Next player goes immediately.e.
Player Passer Spot▲ Cone
The Race: The clock is running. As cones are removed, the floor clears up. But the hard spots remain — the ones everyone misses. Players must make strategic decisions: go to the easy spots first, or attack the tough ones while you’re fresh? Team communication matters: “I’ll take the corner, you hit the elbow!”
Player Passer Spot▲ Cone
The Finish:Down to the last few cones. Pressure mounts — everyone is watching. Can the team clear the floor? Set a time target: “Clear 21 cones in under 4 minutes.” If they beat the clock, no running. If they don’t, the team runs. Track the time daily — watch it drop as the team’s shooting improves.
Coaching Points
This drill creates team accountability — your miss affects the whole team
Players learn to shoot from uncomfortable spots, not just their favorites
The time pressure simulates late-game shooting situations
Coaches can weight certain spots: "three-pointers require 2 makes to remove the cone"
Rotate the cone placements every week to prevent comfort zones
The last 3-4 cones are the hardest — they build mental toughness under team pressure
Team Building
21-Cones is one of the best team-building shooting drills because every player's performance affects the group. When the 12th man steps up and knocks down a tough spot, the whole team celebrates. It builds collective confidence.
Coaching Tool
Track which cones are removed first (team strengths) and which remain the longest (weaknesses). Use this data to design targeted practice for weak spots.
15
Closeout Shooting
Competitive
Closeout
Game Speed
The ultimate game-simulation shooting drill. A defender closes out on the shooter at full speed. The shooter must read the closeout and decide in 0.5 seconds: shoot the three, pump-fake and drive, or one-dribble pull-up. Real decisions, real speed, real shooting.
12
Minutes
60+
Shots
3-4
Players
3PT/Mid
Range
Very High
Intensity
Player Passer Spot▲ Cone
Setup: Passer in the paint with balls. Shooter on the wing at the three-point line. Defender starts in the paint, near the passer. When the pass is thrown, the defender sprints to close out on the shooter. The shooter must catch and make a decision BEFORE the defender arrives: shoot, drive, or pull-up.
Player Passer Spot▲ Cone
The Read: Three reads based on the closeout: (1) Defender closes SHORT (stops before reaching the shooter) → SHOOT the open three. (2) Defender flies past (too aggressive) → PUMP FAKE and drive for a layup. (3) Defender arrives under control → ONE-DRIBBLE pull-up to the side. The shooter has 0.5 seconds to read and react — just like a game.
Player Passer Spot▲ Cone
Full Rotation:The shooter rotates through all 5 spots. At each spot: the passer throws, the defender closes, and the shooter reads. 3 reps at each spot (15 total possessions). Score: 3 points for a made three, 2 points for a made pull-up, 2 points for a made layup, 0 for a miss. Target: 25+ points out of 45. Track results.
Coaching Points
The defender must vary their closeout — sometimes short, sometimes hard, sometimes controlled. Mix it up.
Shooter: catch in your shooting stance EVERY time, even if you're going to drive — don't telegraph your decision
The pump-fake must be realistic — ball goes up to your forehead, eyes look at the rim, then drive
One-dribble pull-up is the hardest read — practice the footwork so it's automatic
This is the closest drill to game shooting — treat every rep like a live possession
Track shot selection: if you're driving when you should shoot (or vice versa), the data will show it
Game Simulation
Every college three is contested — the days of wide-open catch-and-shoot in practice translating to games are over. This drill trains the REAL skill: reading a closing defender and making the right play in 0.5 seconds.
Decision Training
Great shooters aren't just accurate — they make great decisions. This drill trains shot selection (should I shoot or drive?) just as much as it trains shooting mechanics. The best shooters take only good shots.